Create, label and track your assets
Build your asset register in Maint Vision, stick a QR code on every machine and keep a record of every stop.
What you will learn
- Create an asset and place it in a location or under a parent asset.
- Import an existing asset list from the Excel template.
- Print an asset’s QR code label and scan it to open the asset’s record.
- Log downtime and find a machine’s history.
Before you start
- At least one location: Locations › New Location, or the “Create one” link in the New asset window. Every asset must be placed.
- An Owner, Admin or Manager role to create assets (default role settings).
What it is for
The Assets module is the register of everything your team maintains. Each machine has a record that brings together its details, its location, its work orders and its downtime history. A well-kept register is the starting point for everything else: work orders, requests and preventive maintenance all attach to it.
Key concepts
- Asset: anything your team maintains (machine, installation, vehicle, mechanical room). Work orders and requests are linked to it.
- Location: where the machine sits. It is required when you create an asset, except for sub-equipment, which can take its parent’s location.
- Hierarchy: a parent asset and its sub-equipment, for example a line and its machines, or a machine and its motors.
- Criticality: Critical, Important or Normal, to decide what to handle first.
- Operational status: Online, Planned downtime or Unplanned downtime. Each change is dated and kept in the history.
- QR code: every asset has its own. Scanned with the mobile app, it opens the record directly.
Step by step
Step 1: Open the asset register
In the left menu, click Assets. The list 1 shows each machine with its tag, location and status. Click a row: its record opens on the right 2. The Status, Criticality and Location filters narrow the list, and Tree 3 groups assets under their parent (By equipment) or under their location (By location).
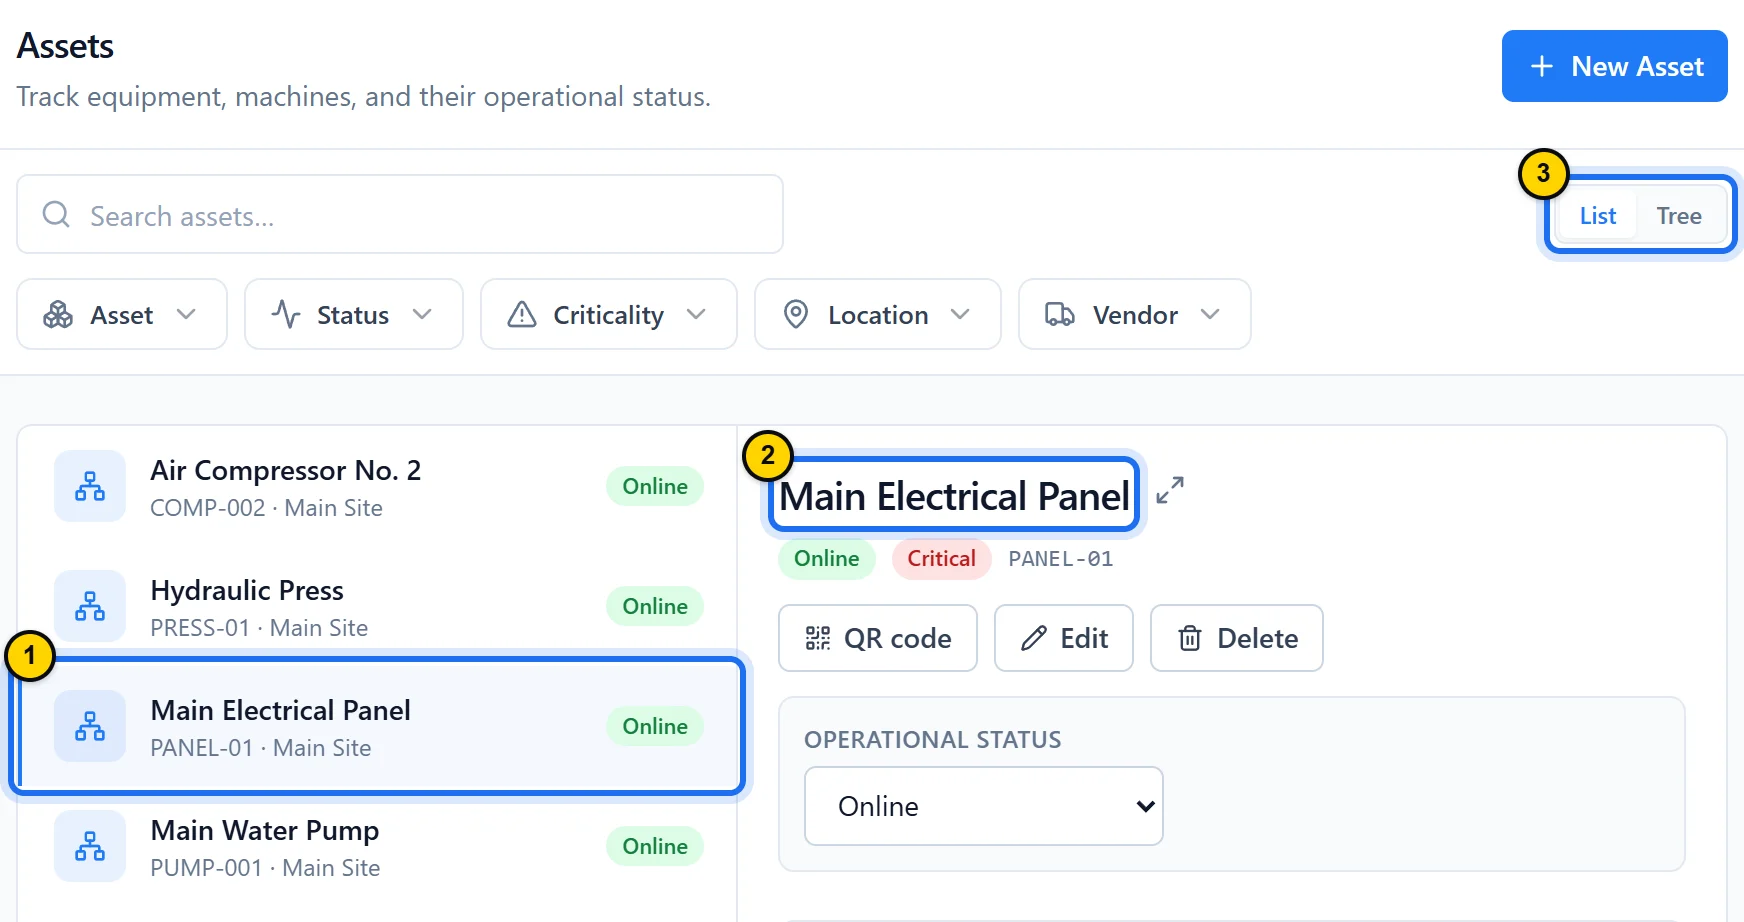
Fig. 1.1The list on the left, the selected asset’s record on the right.Tap the screenshot to enlarge it. - Marker 1: One row per asset: name, tag, location and status.
- Marker 2: The selected asset’s record, with its status and criticality.
- Marker 3: List or Tree: two ways to browse your assets.
Step 2: Create an asset
Click New Asset. Enter the Name 1 your team uses on the shop floor. Set the Status and Criticality. Next, pick the Location 2: it is required, unless you attach the machine to a Parent equipment 3 that already has one, in which case it takes that location. Click Create asset.
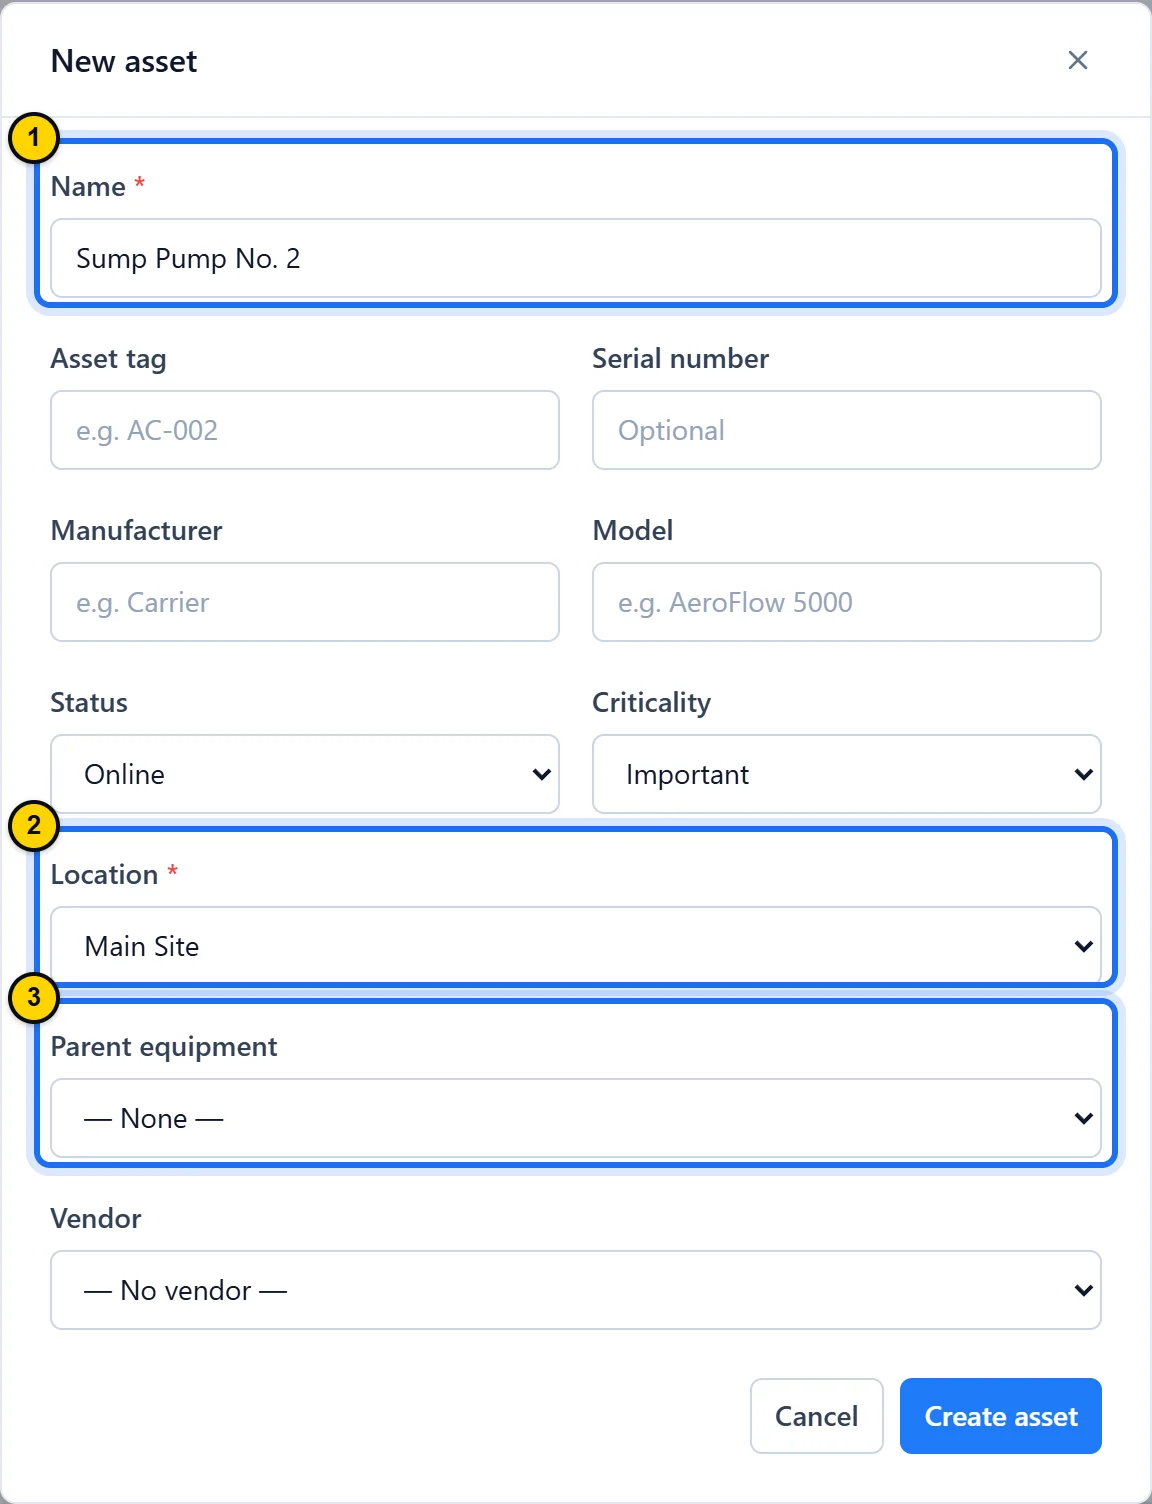
Fig. 1.2A name and a location, or a parent that already has one, are all it takes to create the record.Tap the screenshot to enlarge it. - Marker 1: Name: the only required text field.
- Marker 2: Location: required, unless the asset has a parent that already has one.
- Marker 3: Parent equipment: attaches the machine to a line or to a larger machine.
TipThe Asset tag is optional but unique within your organization: it is printed under the name on the QR code label.
Step 3: Import an existing asset list
At the bottom of the left menu, click your name (Settings), then General (owner and admins by default). Under Import data, open the Assets tile and click Download the template 1: fill in one row per asset. Save the workbook as “CSV UTF-8” (File › Save As), then select it in the import window. Click Check the file: nothing is saved in Maint Vision yet, and every rejected row is listed with its reason. Finally, click “Import: N row(s)”: only the accepted rows are created, and an import cannot be undone.
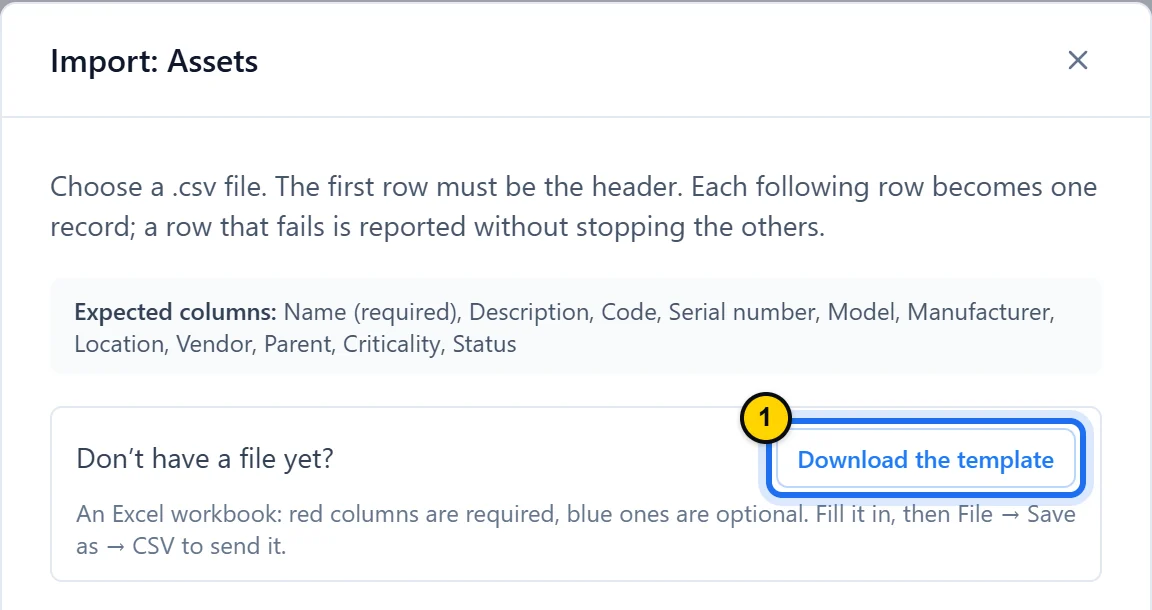
Fig. 1.3Download the Excel template here: red columns are required, blue ones optional, but every row needs a location or a parent asset.Tap the screenshot to enlarge it. - Marker 1: Download the template: a ready-to-fill workbook; do not rename its headers, since the import uses them to recognize each column.
TipEach row must name a location that already exists, or a parent asset already in Maint Vision: a parent added in the same file is not recognized. So import the main machines first, then their sub-equipment in a second file. Other CSV formats garble accented letters and symbols such as ° in your names, and Check the file does not warn you.
Step 4: Print the QR code label
On the asset’s record, click QR code. Print 1 prepares a label with the QR code, the asset name and its tag; Download 2 saves the QR code as a PNG image. Stick the label on the machine, in a clean and visible spot. In the field, a technician opens the Assets tab of the mobile app, taps the QR code icon at the top right and points the camera at the label: the record opens. By default, the owner, admins and managers also see the Public reporting link 3: Create the public link produces a reporting QR code that works without an account, and each report becomes a request (lesson 3).
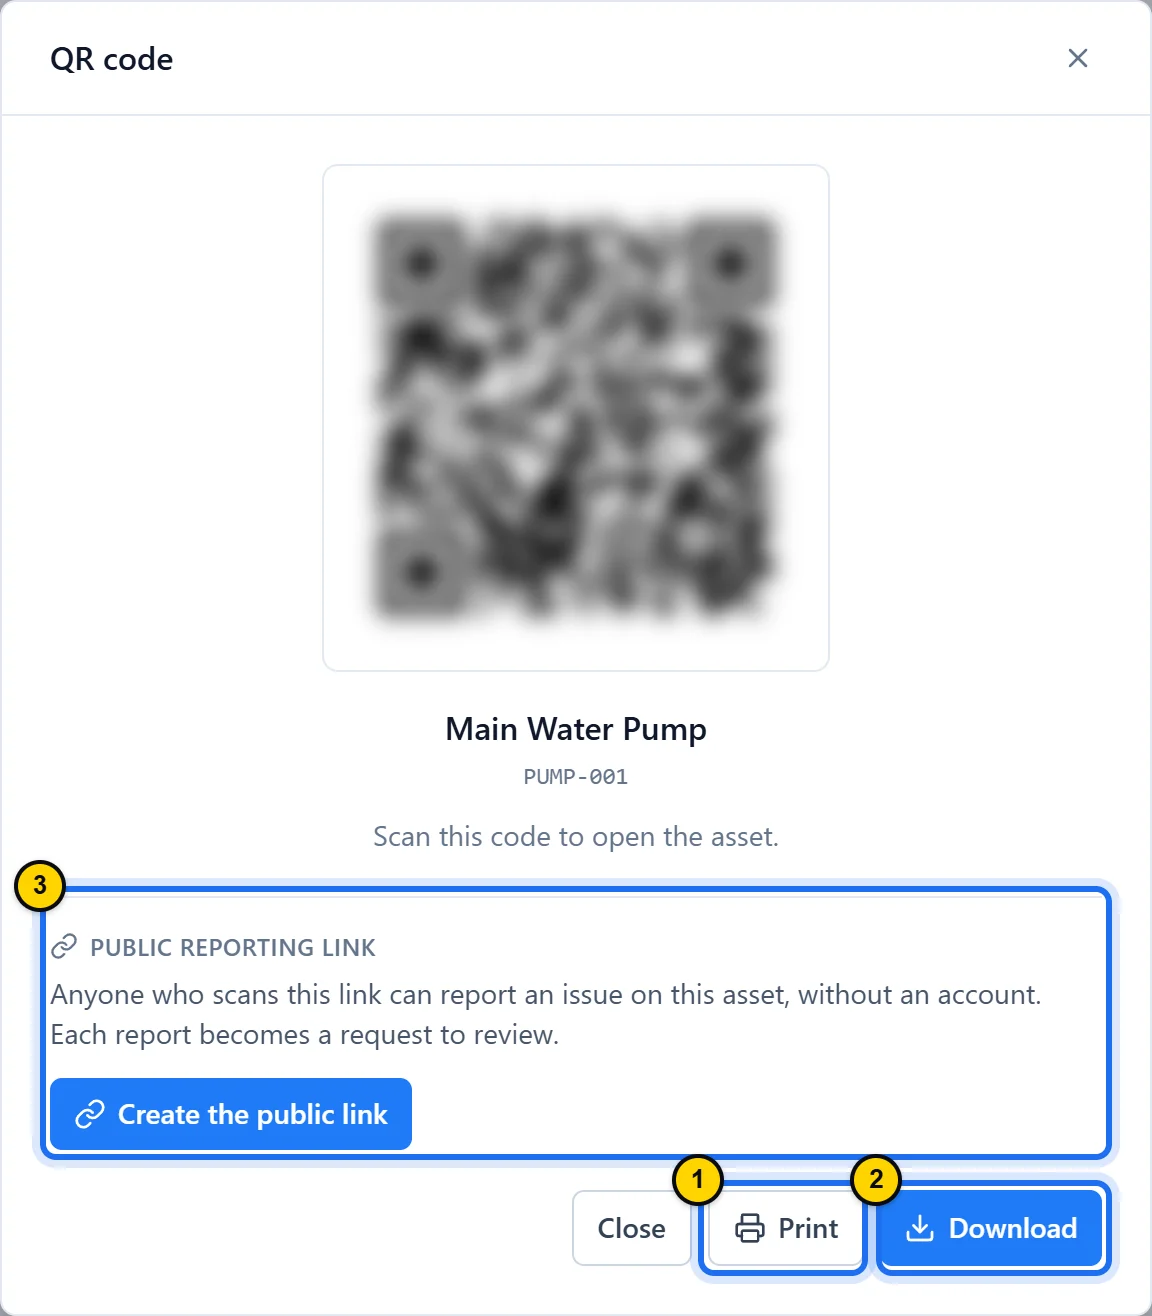
Fig. 1.4The QR code (blurred here) opens the asset’s record: print it or download it.Tap the screenshot to enlarge it. - Marker 1: Print: a label with the QR code, the asset name and its tag.
- Marker 2: Download: the QR code as a PNG image.
- Marker 3: Create the public link: a link to a form that needs no account, active until you revoke it.
TipOnce the public link exists, the window shows the reporting QR code, and Print then prepares its label: it does not open the record in the mobile app, so keep the record’s label too (see lesson 3, last step). To print labels for all your assets at once, open General as in the previous step (same access): Assets tile under Export data, QR codes (PDF) format, then Export.
Step 5: Find a machine’s history
On the record, the Work Orders section lists the machine’s jobs: those in progress first 1, completed ones last 2. Click a row to open the work order. The record shows eight at most: for the full history, open Work Orders in List view, then click Add a filter › Asset and select the machine in that new filter. Further down, Status history keeps every stop with its reason and duration, and Photos & files holds manuals, drawings and photos. The Preventive maintenance plans and Meters on the record are part of the Pro plan (lessons 6 and 7).
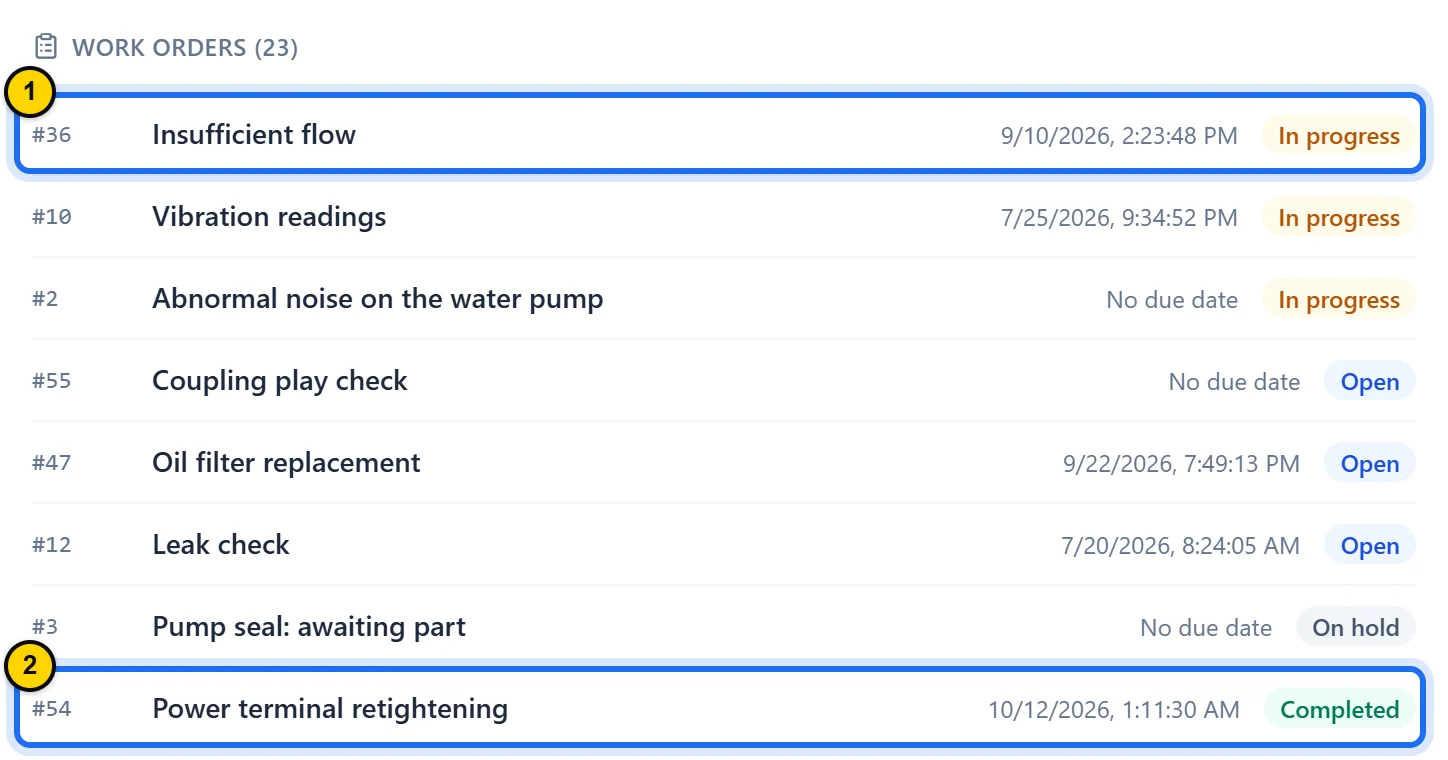
Fig. 1.5The record shows eight jobs at most, sorted by status: in progress, open, on hold, then completed.Tap the screenshot to enlarge it. - Marker 1: A work order In progress, at the top of the list.
- Marker 2: A Completed work order, at the end of the list.
TipOn a phone, the record opened by a scan offers Create a work order for this asset: the new work order form opens with the machine already selected.
Step 6: Log downtime
When a machine stops, open its record. Under Operational status 1, choose Unplanned downtime for a breakdown, or Planned downtime for a scheduled stop. Enter the Downtime reason 2, then click Save 3. When it restarts, set it back to Online: the Status history then shows how long the stop lasted. On a phone, the same action is under Change status.
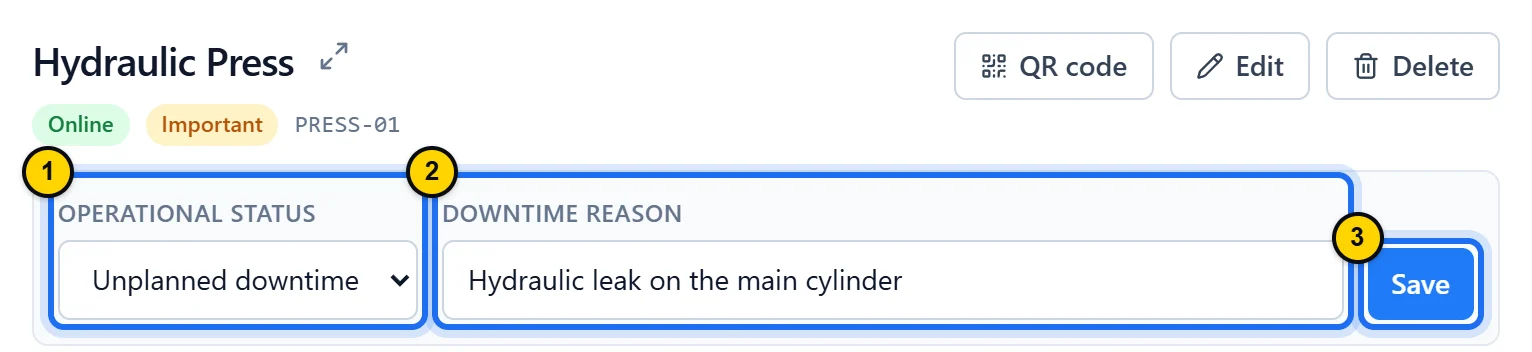
Fig. 1.6Pick the status, enter the reason, then save.Tap the screenshot to enlarge it. - Marker 1: Operational status: Online, Planned downtime or Unplanned downtime.
- Marker 2: Downtime reason: the cause, in a few words.
- Marker 3: Save only appears once the status or the reason has changed.
TipBy default, technicians, managers, admins and the owner can change the status; viewers and storekeepers see it but cannot change it.
Good to know
- Settle on a naming convention before you build the register, for example family, number and area: search and filters will work much better.
- Keep Critical for machines whose downtime halts production: if everything is critical, nothing is.
- In Tree view, with the By equipment grouping, drag an asset onto another to attach it to that parent (owner, admins and managers by default).
- Spare parts are linked to a machine from the part’s record, not from the asset’s: see lesson 4.
- An asset that still has work orders, requests, preventive plans, meters, linked parts or sub-equipment (among other links) cannot be deleted: its history is protected. The deletion window lists what blocks it.
Key takeaways
- An asset needs a name and a location, or a parent that already has one.
- Scanned with the mobile app, its QR code opens the machine’s record directly.
- Every stop you log, with its reason, goes into the status history.
Module overviewAssets & QR →