Build a procedure and run it on a work order
A checklist you build once, attach to work orders and fill in on site, step by step.
What you will learn
- Build a procedure with the right field types, in the order the job is done.
- Make critical checks required and score your inspections.
- Attach the procedure to a work order, a preventive plan or a template.
- Run the procedure and find its results on the work order.
Before you start
- Lesson 2, “Work orders”: you know how to create a work order and open its page.
- The Pro plan or the 30-day free trial: you need one of them to create procedures.
- An Owner, Admin or Manager role to create and edit procedures (default role settings).
What it is for
A procedure is the checklist a technician works through during a job: items to check off, readings to record, a photo and a signature. You build it once in the library, then attach it to the work orders that need it. Required fields prevent anyone from closing an incomplete execution, and a work order cannot be completed until its procedure is. Know-how no longer lives only in your veterans’ heads: it is written down, tracked and verifiable.
Key concepts
- Procedure: a reusable template made of fields to fill in. It lives in Library › Procedures, and every work order that carries it gets its own copy to fill in.
- Field: something the technician must check, measure or prove. The type list offers twelve field types, including Checkbox, Number, Inspection, Photo / file and Signature, plus two layout elements, Header and Section, which ask for nothing: they break the form into parts in the preview and in the mobile app, but not in the web execution.
- Required field: without an answer, the execution cannot be completed. A Photo / file or Signature field needs at least one file.
- Scoring: each answer in an Inspection or Multiple choice field is worth points, and the execution shows a score.
- Execution: the procedure filled in on a work order. Its fields are frozen when it starts: editing the procedure afterward does not change an execution already underway.
- Permissions: by default, only Owner, Admin and Manager accounts can create and edit procedures. Technicians run them on work orders; a Contractor, only on the work orders assigned to them.
Step by step
Step 1: Open the procedure library
In the left menu, open Library, then click Procedures. The list shows each procedure by name 1: a click opens its page, with its fields and links. The Fields column 2 counts its elements, sections and headers included; Assets and Locations count its links. To create one, click New Procedure 3.
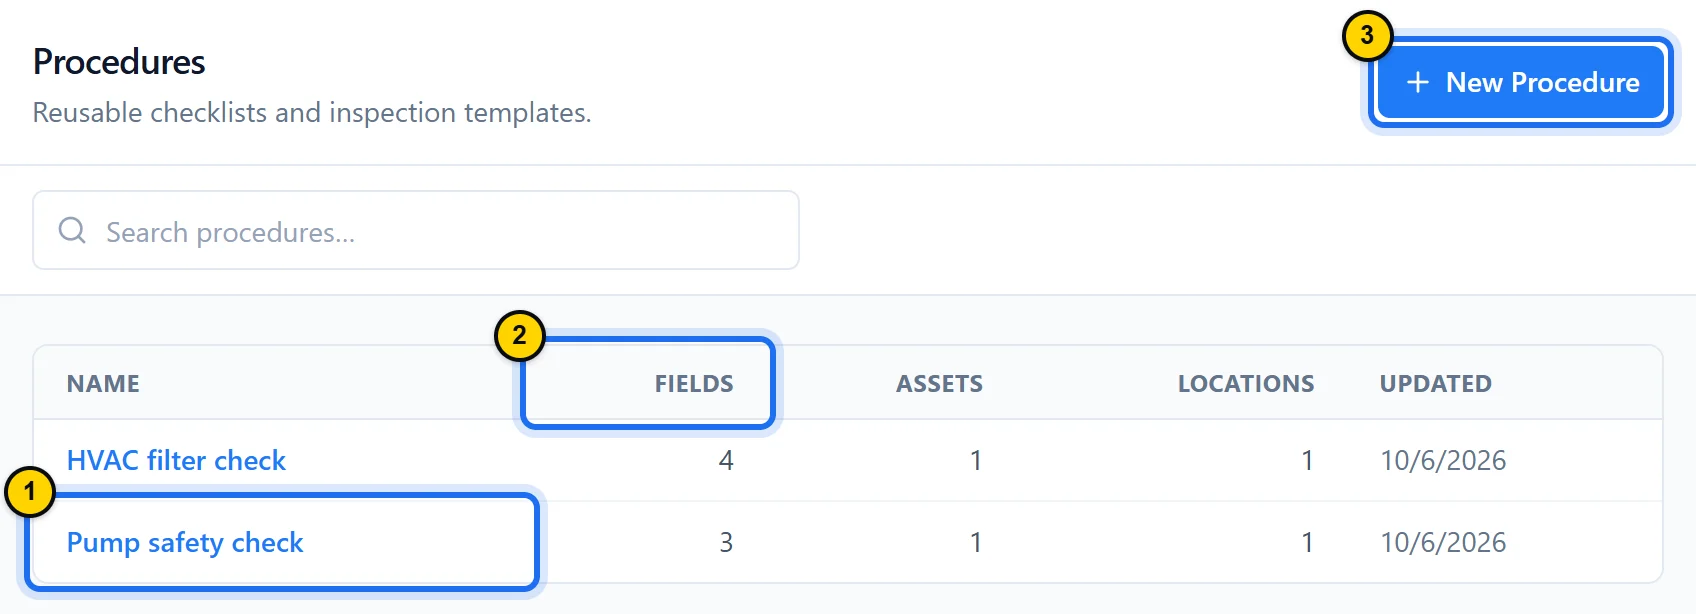
Fig. 5.1The procedure library: each row is a template ready to attach to a work order.Tap the screenshot to enlarge it. - Marker 1: A procedure name: click it to open its page.
- Marker 2: Fields: how many elements the procedure has, sections and headers included.
- Marker 3: New Procedure: only shown to accounts allowed to create procedures.
TipOn the free plan, the New Procedure button shows a lock: creating procedures comes with the Pro plan and the 30-day free trial.
Step 2: Add fields in the order the job is done
Click New Procedure: the window opens on the Procedure fields tab. For each step of the job, pick the field type 1, then write its label the way the technician will read it. Check Required 2 for the items no one should skip. Add the next field with Add field 3, and group steps together with Add section.
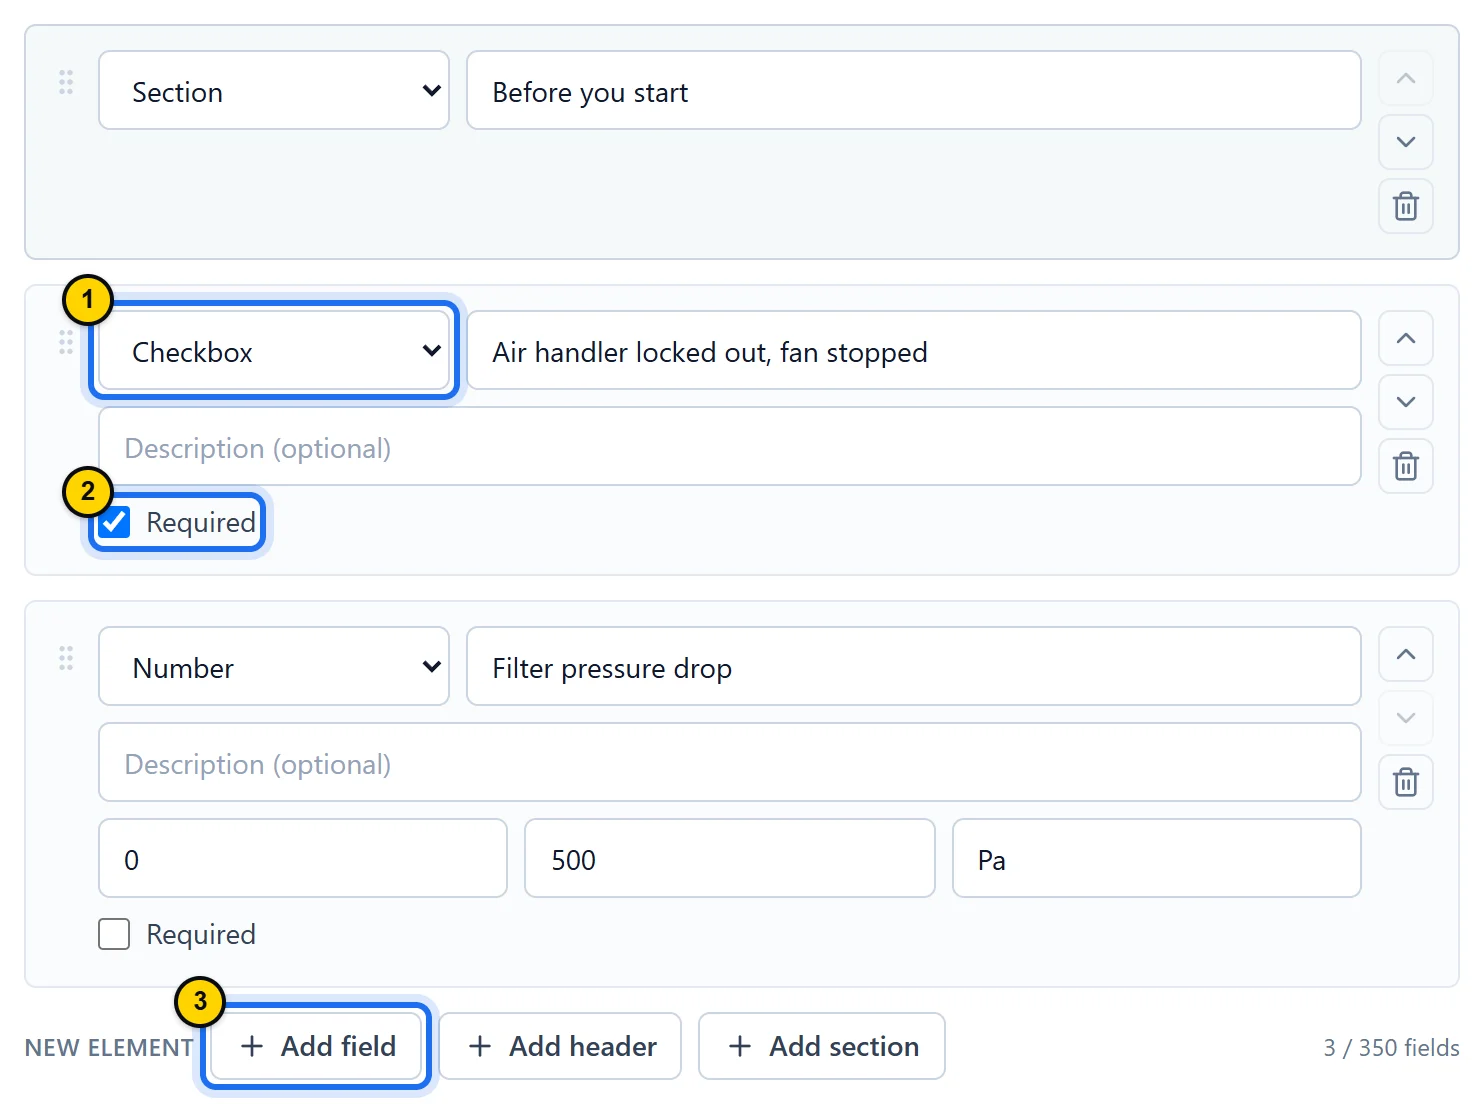
Fig. 5.2Each field combines a type, a label and the Required box; its optional description is not shown during execution.Tap the screenshot to enlarge it. - Marker 1: The field type: Checkbox for a check, Number for a reading with a minimum, maximum and unit, Photo / file for proof.
- Marker 2: Required: without an answer, the execution cannot be completed.
- Marker 3: Add field: a new field at the bottom of the list; the arrows to the right of a field move it up or down.
TipThe Generate with AI box at the top of the tab drafts a procedure from a description or a manual. It is part of the Business plan and is not included in the free trial. On the Pro plan and during the trial, an “Available on the Business plan” notice appears in its place. Always review the draft before you save it.
Step 3: Score your inspection points
Check Scoring at the top of the window to give points to answers. Then pick the Inspection type 1: the technician chooses one answer among those you offer. Write each possible answer, then its points in the box next to it 2. Add another answer with Add option 3.
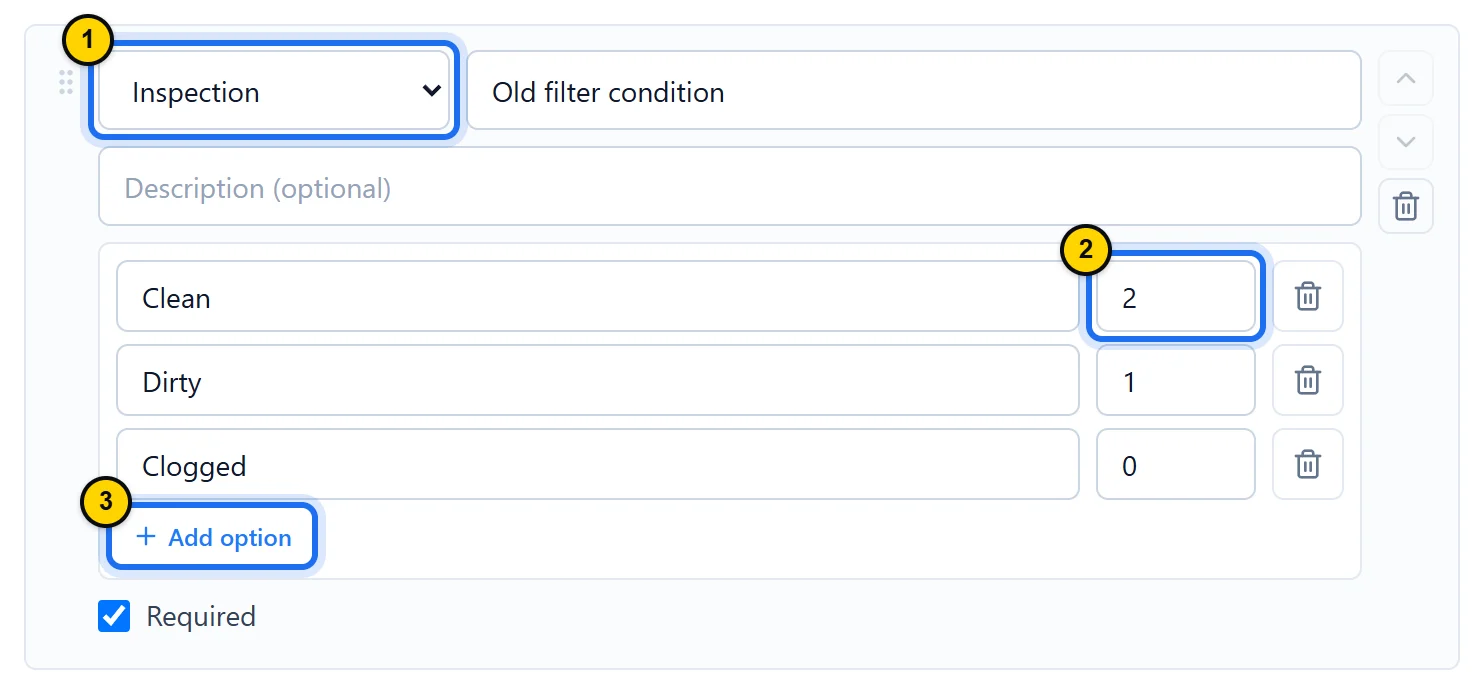
Fig. 5.3A scored inspection: each answer is worth points, from the best condition to the worst.Tap the screenshot to enlarge it. - Marker 1: The Inspection type: one answer chosen among those you define.
- Marker 2: The answer’s points: a clean filter gets the maximum.
- Marker 3: Add option: one more possible answer.
TipPoints only apply to Inspection and Multiple choice fields, which accept a single answer; Checklist lets the technician check several, with no points. The score shows on the work order and stays with the completed execution; reports do not include it.
Step 4: Check the form with the preview
Click Preview 1: the fields appear the way the technician will fill them in, and the button turns into Edit to go back to editing. Read through the order and wording of the fields. A red asterisk flags each required field 2. Each scored answer shows its points 3.
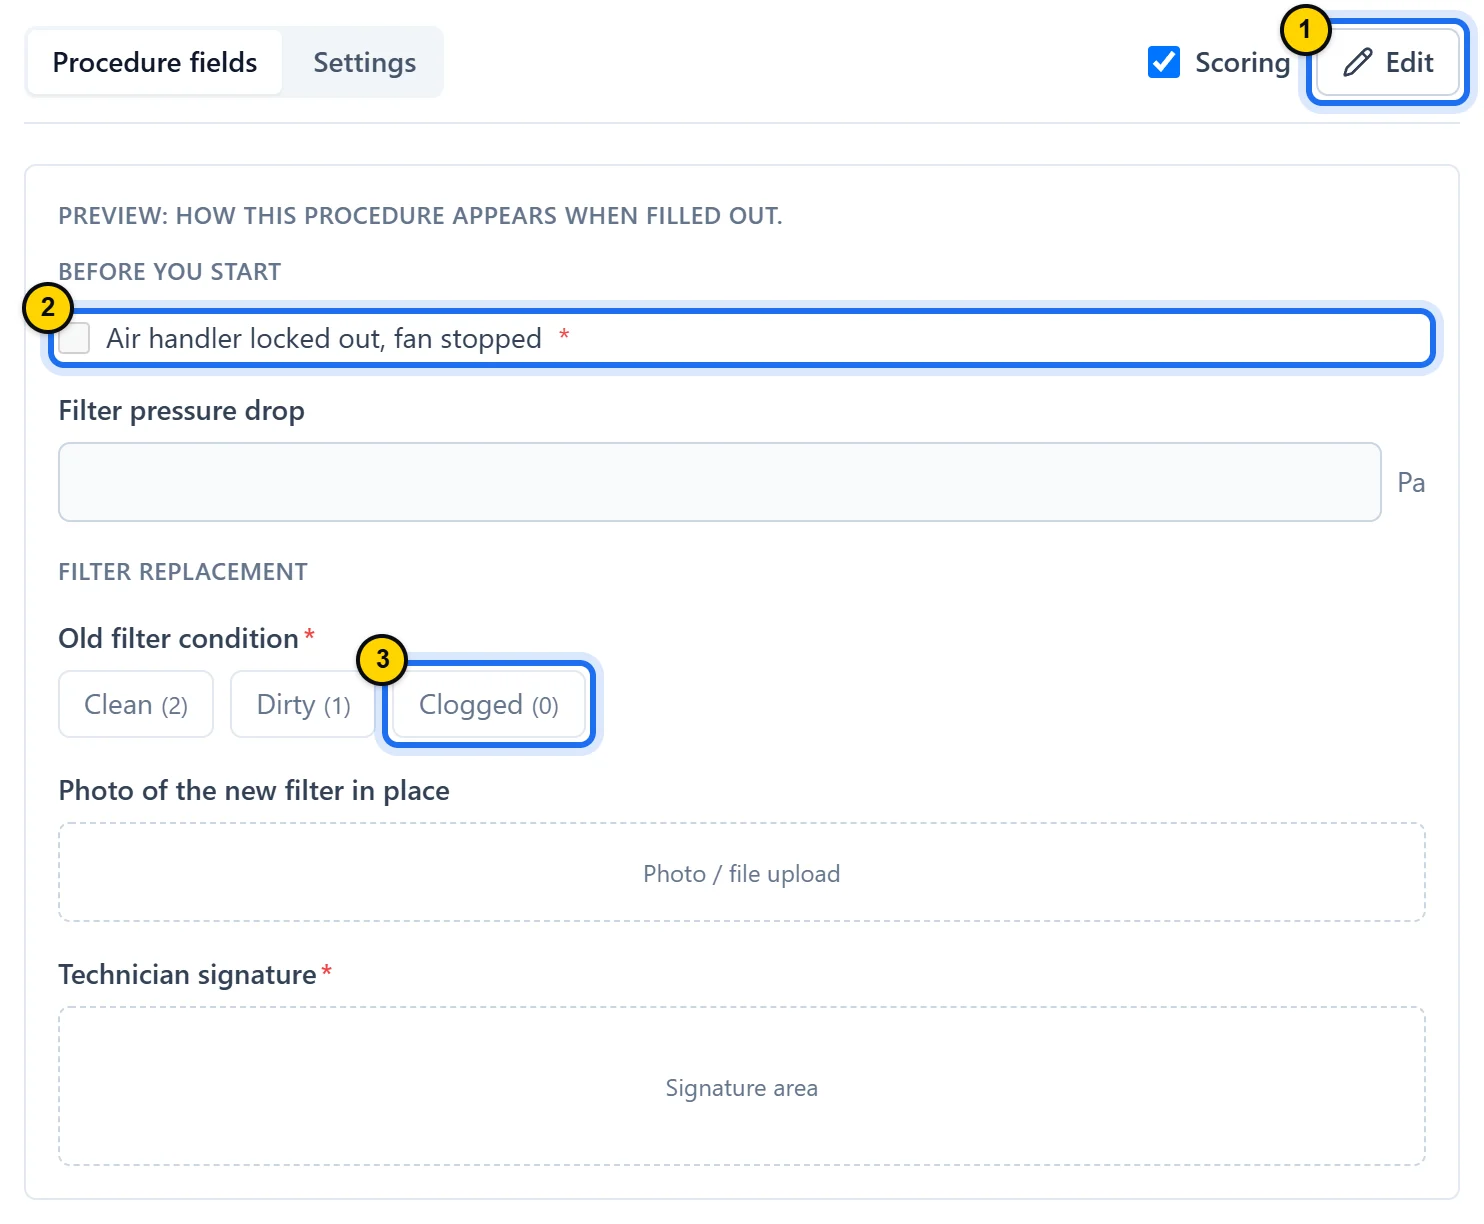
Fig. 5.4The preview shows the fields the way the technician will fill them in; during execution, sections and headers appear in the mobile app, not on the web.Tap the screenshot to enlarge it. - Marker 1: The toggle: Preview shows the form, Edit goes back to editing.
- Marker 2: A required field, flagged by its asterisk.
- Marker 3: An answer and its points: a clogged filter earns none.
Step 5: Name the procedure, then create it
Open the Settings tab 1. Enter the Name, the only required setting, and a description if needed. Under Link to (optional), check the assets and locations involved 2. Click Continue 3: the procedure is created and appears in the list.
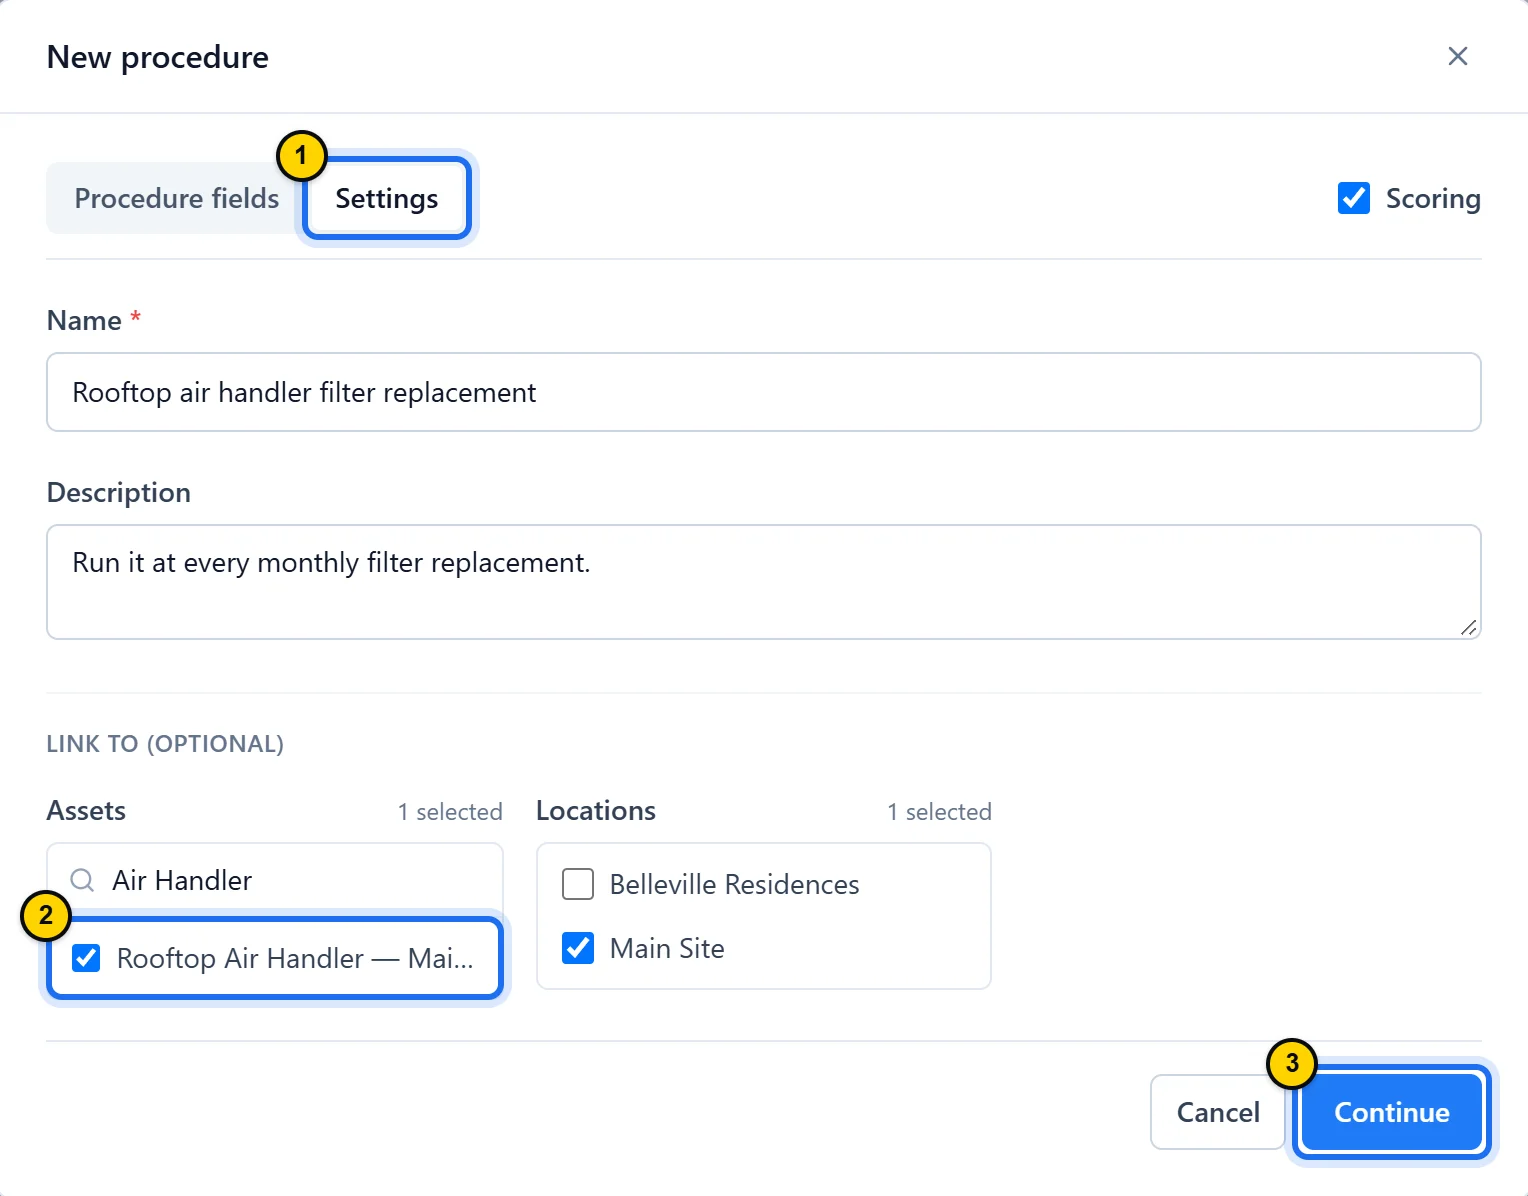
Fig. 5.5The name is the only required setting; links help you find the procedure again.Tap the screenshot to enlarge it. - Marker 1: The Settings tab: name, description and links.
- Marker 2: A linked asset; the search box narrows a long list.
- Marker 3: Continue creates the procedure; Cancel closes the window without creating anything.
TipLinking an asset does not attach the procedure to that asset’s work orders: the link is a reference shown in the list and on the procedure page. The work order, preventive plan or template carries the procedure, as the next step shows.
Step 6: Attach the procedure to a work order
Open the work order, then click Edit. Open the Procedure field 1. Type a few letters of the name to filter the list 2, then click the procedure. Finally, click Save changes. When you create a work order, the same Procedure field appears in the form that New Work Order opens.
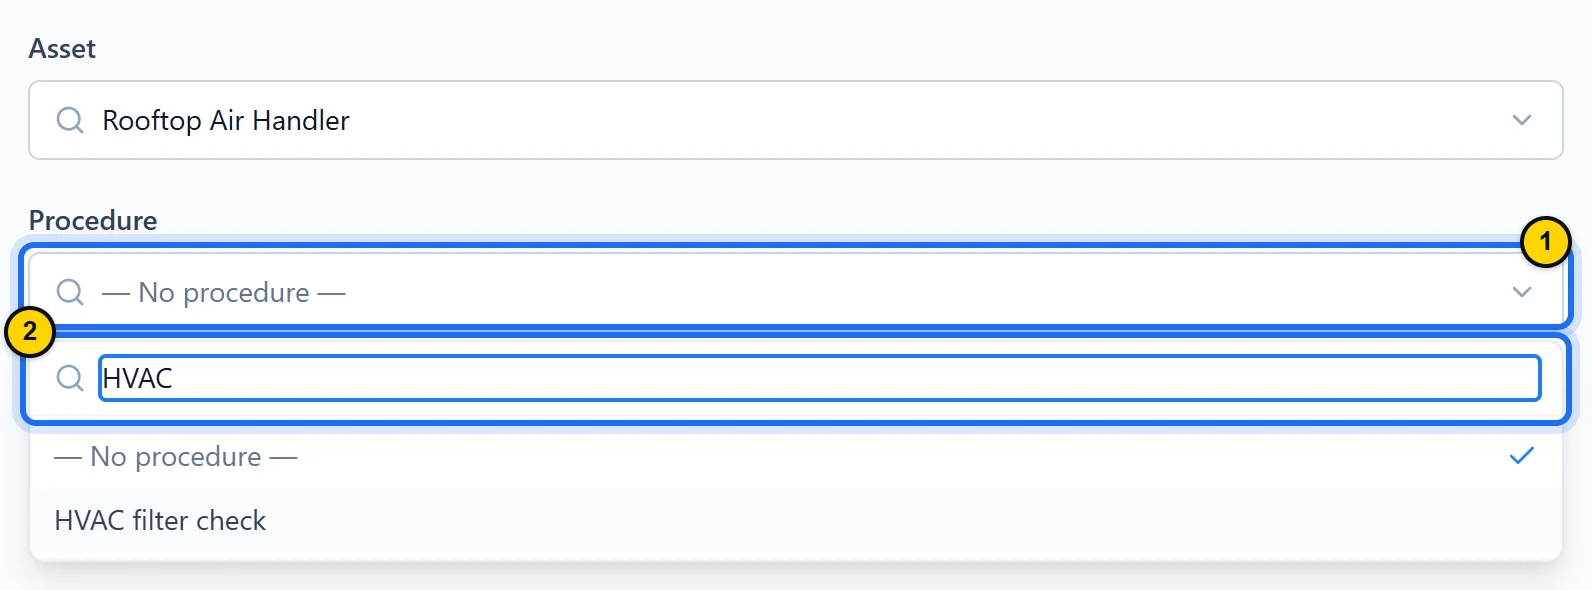
Fig. 5.6A work order carries a single procedure, picked from the library.Tap the screenshot to enlarge it. - Marker 1: The Procedure field: one click opens the library.
- Marker 2: The search box: a few letters are enough to find the procedure.
TipA preventive maintenance plan (asset record, Preventive maintenance section, lesson 6) and a work order template (Library › Work Order Templates) can carry a procedure too: pick it in their Procedure field; every work order they generate inherits it. A procedure that is still attached somewhere cannot be deleted; detach it first.
Step 7: Run the procedure, then close the work order
On the work order, the Procedure execution section shows the attached procedure. The technician clicks Start execution: the execution’s status and who started it appear at the top 1. They fill in the fields 2: each answer is saved as they go. They then click Complete execution 3: if a required answer is missing, a message names the fields to fill in. Once completed, the execution stays in the section, read-only, showing who completed it, when and, if scoring is on, its score; the work order can then move to Completed.
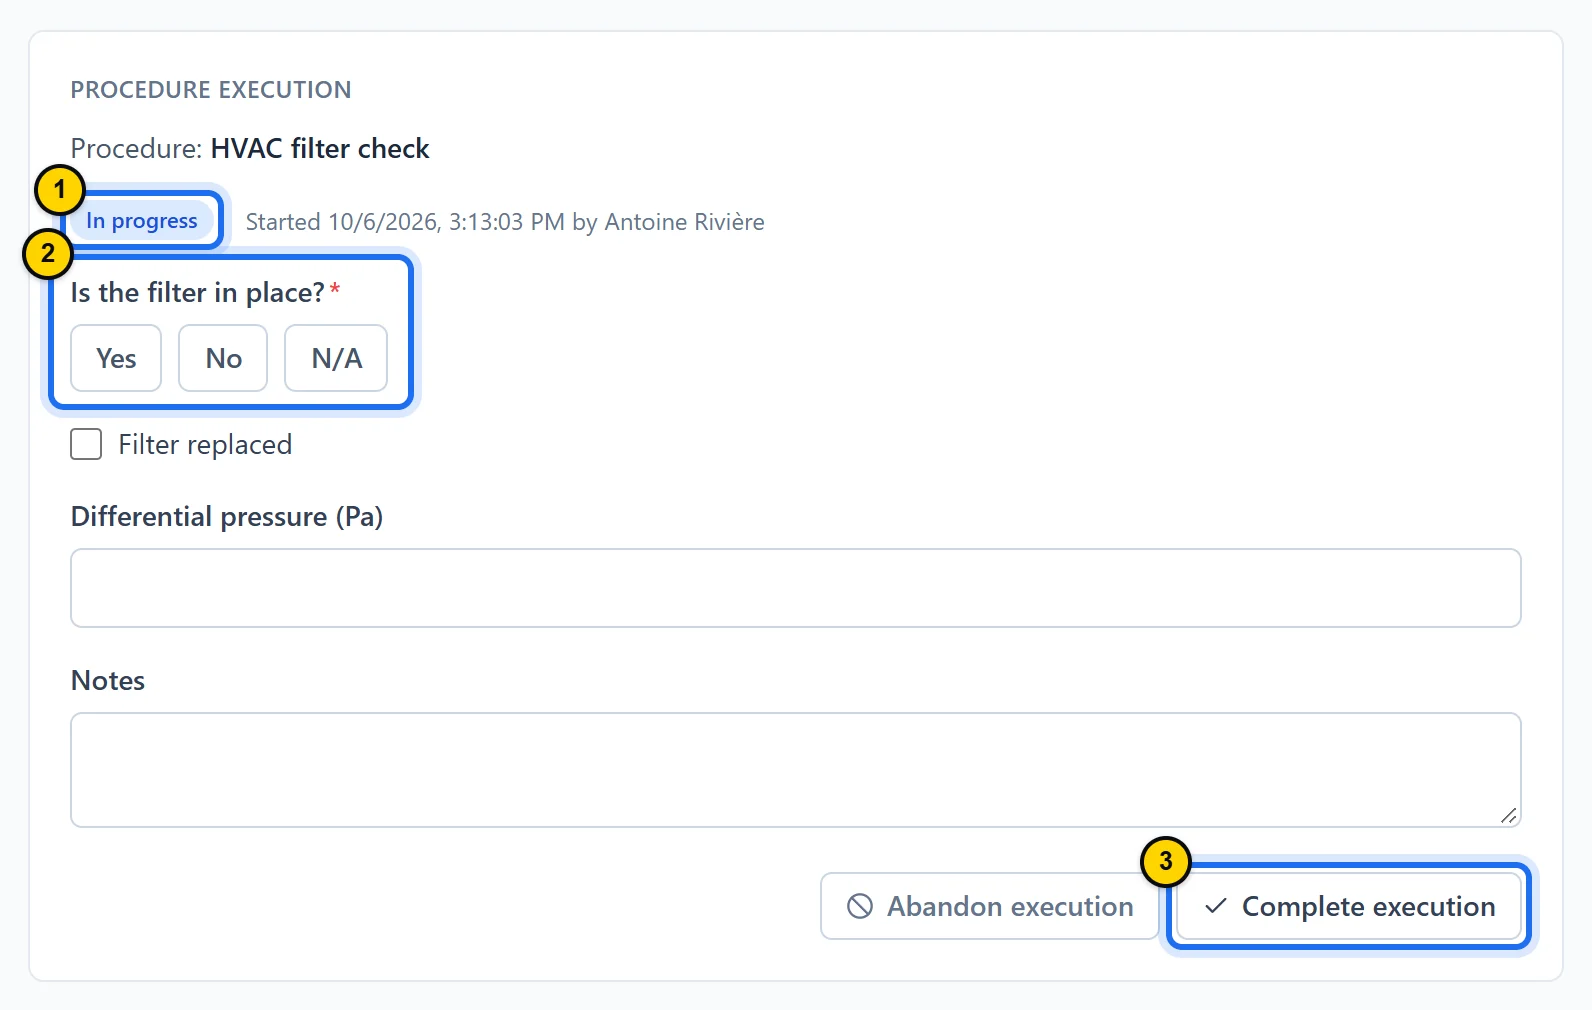
Fig. 5.7An execution in progress: the technician fills in the fields, then completes the execution before closing the work order.Tap the screenshot to enlarge it. - Marker 1: The execution status, with when it started and who started it.
- Marker 2: A required question, flagged by the asterisk: one click on the answer is enough.
- Marker 3: Complete execution: if a required field is still empty, a message names it.
TipAn execution started by mistake is closed with Abandon execution: its entries stay in the history but never count. Only the person who started it or, by default, an Owner, Admin or Manager can abandon it. To run the procedure again, Start a new execution adds a blank execution and keeps the earlier ones.
Good to know
- Word each field so that a stand-in understands it without help: a precise check, “Fan stopped,” rather than a vague word, “Fan.”
- Keep Required for safety-critical items and mandatory proof: too many required fields slow the field team down without guaranteeing anything more.
- A Meter reading field keeps the value inside the procedure: it does not record a reading on the asset’s meter. To track a meter, enter its readings in Meters (lesson 7).
- The mobile app runs procedures but does not build them. The work order’s Procedure section offers Start the procedure, then Complete the procedure; photos come from the camera or the gallery, and the signature is drawn with a finger after tapping Sign. Without a network connection, nothing is saved. If your mobile app does not offer to abandon an execution, do it from the web.
- To improve a procedure, open its page and click Edit: executions already started keep their original fields, and the next ones use the new version.
Key takeaways
- You build a procedure once, field by field, in Library › Procedures.
- Required fields and scoring make every execution complete and comparable.
- Once attached to a work order, it must be completed before the work order can be.
Module overviewAI & procedures →