Track your assets’ usage with meters
Running hours, cycles, mileage: read each meter so you can service your machines based on how much they are actually used.
What you will learn
- Create a meter and link it to the asset it measures.
- Log a reading on the web or in the mobile app.
- Review the reading history and fix a wrong value.
- Trigger a work order every 500 hours (Business plan).
Before you start
- The asset you want to track already exists under Assets (lesson 1).
- An Owner, Admin or Manager role to create a meter; technicians log the readings (default role settings).
- The Pro plan, or the 30-day free trial, which includes it.
What it is for
A meter measures how much an asset is actually used: running hours, cycles, mileage, press strokes. Many maintenance tasks are due by usage rather than by date, such as a service every 500 hours. Every reading you log in Maint Vision is added to the meter’s history, and the most recent one sets its current value. On the Business plan, a reading can also create the work order on its own.
Key concepts
- Meter: a value that grows as a machine is used (hours, cycles, miles). It has a name, a free-text unit and, usually, the asset it measures.
- Reading: a value read on the machine, with its date. The most recent reading sets the meter’s current value.
- History: every reading is kept; a new one never overwrites an older one. A reading cannot be edited; a wrong value is deleted, then entered again.
- Data entry: by hand, on the web or on a phone. Maint Vision does not read values from machines and does not import readings; an integration can send them through the API (Business plan).
- Inactive meter: unchecking Active freezes the meter. New readings are refused and its automations stop firing; the history is kept.
- Automation: a rule that creates a work order when a reading reaches a threshold or a set increase (Business plan).
Step by step
Step 1: Open the meter list
In the left menu, under Optimize, click Meters. Each row 1 shows a meter’s current value, its unit and the asset it measures. The Last reading column 2 shows when the meter was last read, so a meter nobody reads anymore stands out at a glance. Click a meter’s name to open its record, or click New Meter 3 to create one.
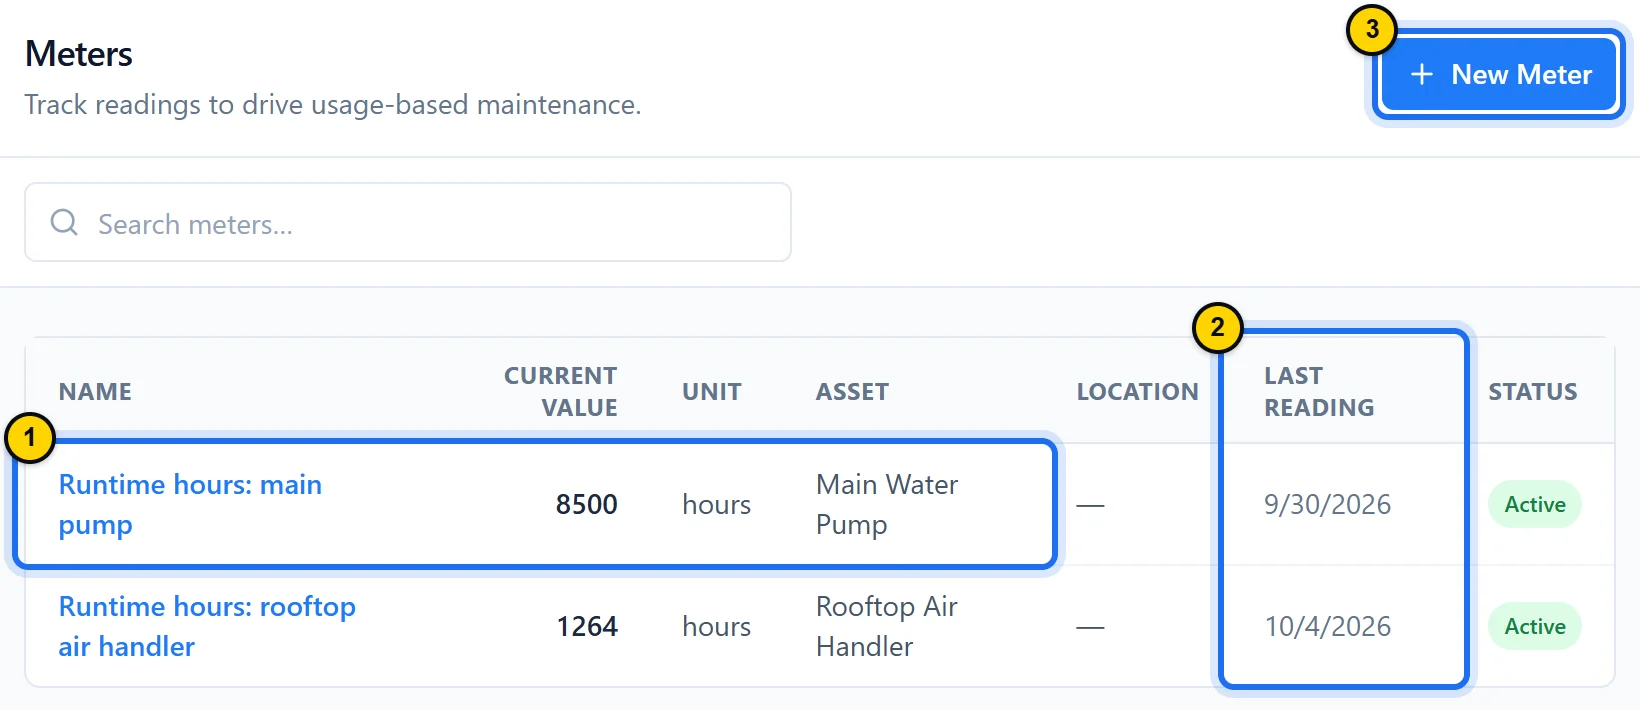
Fig. 7.1One row per meter: its current value, the asset it measures and the date of its last reading.Tap the screenshot to enlarge it. - Marker 1: A meter: its name, current value, unit and the asset it measures.
- Marker 2: Last reading: the date the meter was last read.
- Marker 3: New Meter: opens the creation form (next step).
Step 2: Create a meter
Click New Meter. Enter a clear Name and the Unit shown on the machine 1, such as hours, miles or strokes. Pick the Asset it measures 2: the meter will also appear on that asset’s record. Enter the Initial value 3, the value you read on the machine today. Click Create meter.
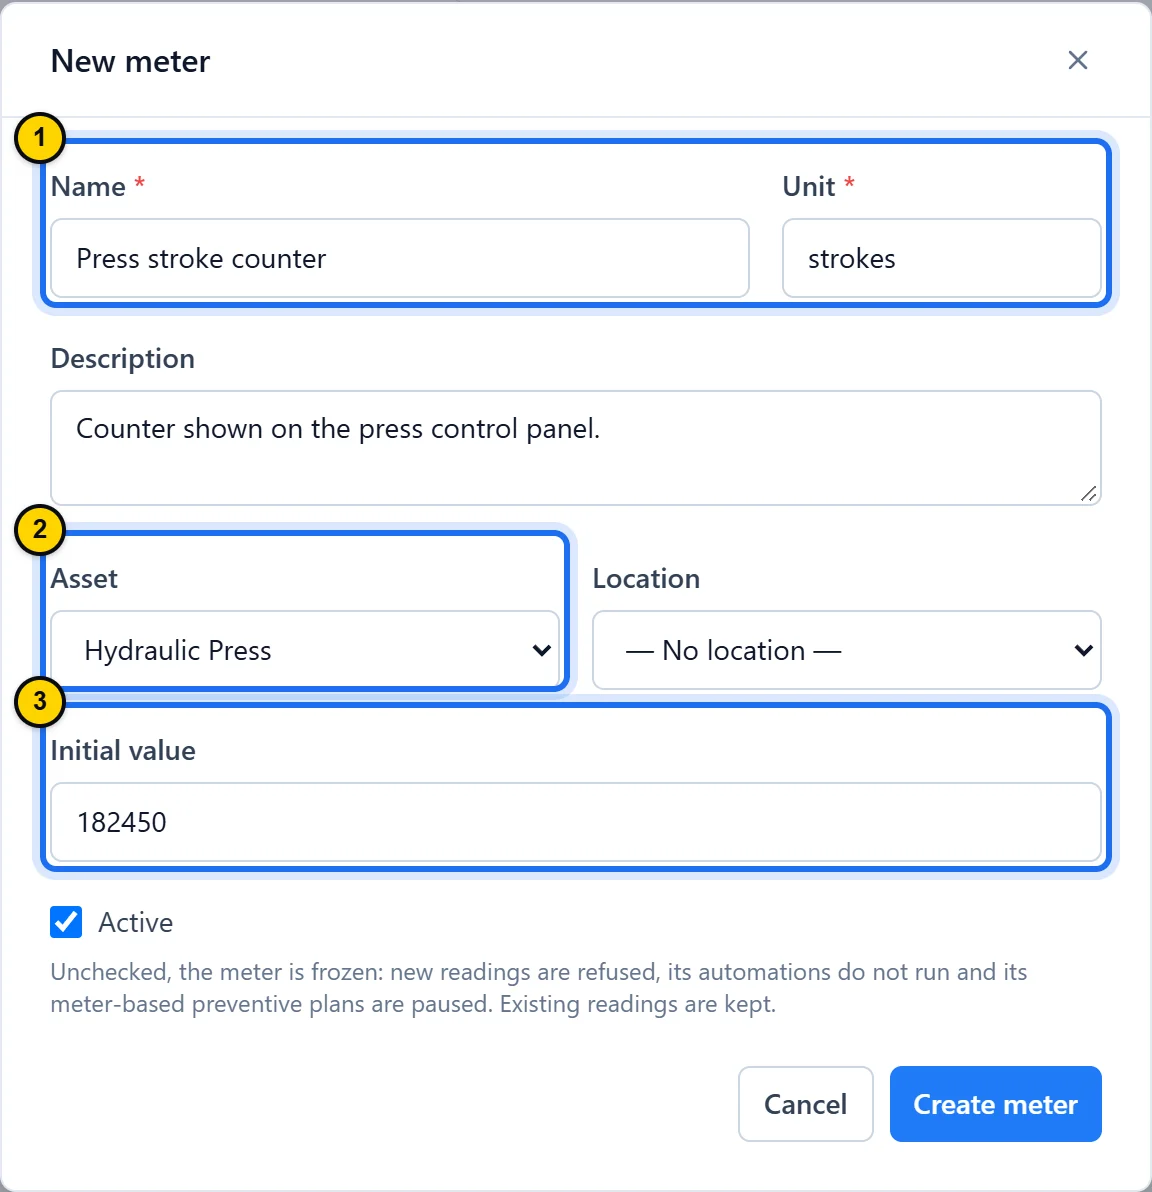
Fig. 7.2A name, a unit and the asset it measures; the initial value matches what the machine shows.Tap the screenshot to enlarge it. - Marker 1: Name and Unit: the only two required fields.
- Marker 2: Asset: the machine whose usage the meter tracks.
- Marker 3: Initial value: the value read on the machine on the day you create the meter, 0 by default.
TipOnce the meter exists, its value only moves through readings. For a machine taken out of service, open the meter, click Edit and uncheck Active: the meter is frozen and its history is kept.
Step 3: Add a reading
On the meter’s record, click Add reading 1. In the window that opens, enter the Value read on the machine, in the meter’s unit. Leave Reading time blank to use the current time; otherwise, enter when the value was read. Add a Note if needed. Click Add reading at the bottom of the window: the value under the name and the Last reading line 2 update.
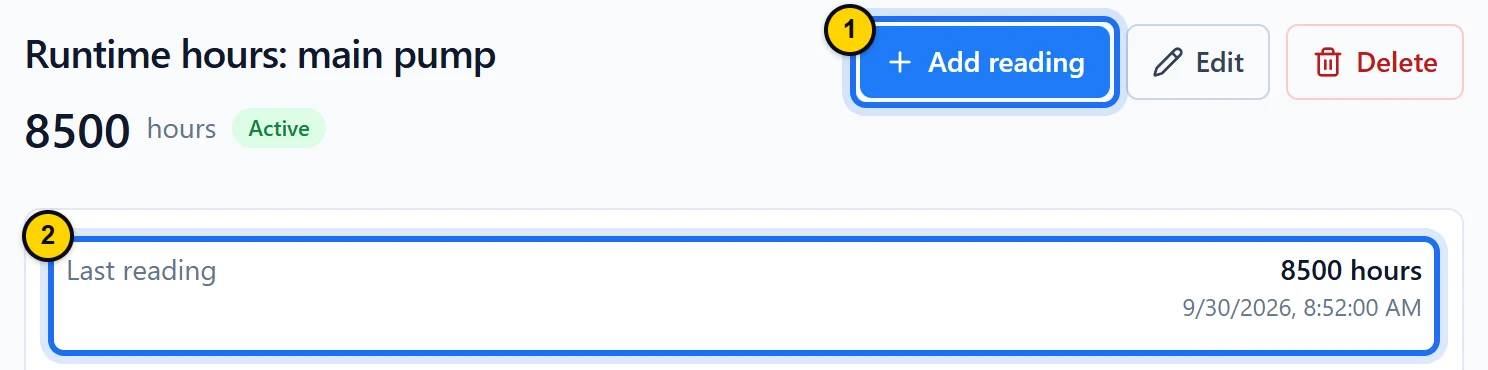
Fig. 7.3The meter’s record: the reading button at the top, the value and date of the last reading right below.Tap the screenshot to enlarge it. - Marker 1: Add reading: opens the entry window, with the Value, Reading time and Note fields.
- Marker 2: Last reading: the latest value and when it was read.
TipA value lower than the current one shows a warning: check the number. If the meter was replaced or reset, save it anyway: Maint Vision starts again from the new value. A reading time in the future is refused.
Step 4: Log a reading from a phone
In the field, open the asset’s record from the Assets tab of the mobile app, or scan its QR code. In the Meters section, tap Record reading next to the meter. Enter the Value and, if needed, a Note. Tap Record reading to save. All meters are also listed under the More tab, in Meters: tap a meter to log its reading.
TipLogging a reading needs a connection and uses the time of entry: when you are offline, write down the value and the time, then enter them on the web, filling in Reading time. By default, technicians, managers, admins and the owner can log readings; storekeepers and viewers can see meters but cannot log readings.
Step 5: Review the history and fix a mistake
At the bottom of the record, the Readings section lists values from newest to oldest; the first one 1 is the current value. Reading time 2 is when the value was read, Recorded when it was entered. A reading cannot be edited: if a value is wrong, click the trash icon on its row 3. Confirm with Delete reading: the current value is recomputed from the latest remaining reading. Then log the correct value with Add reading, using the same Reading time.
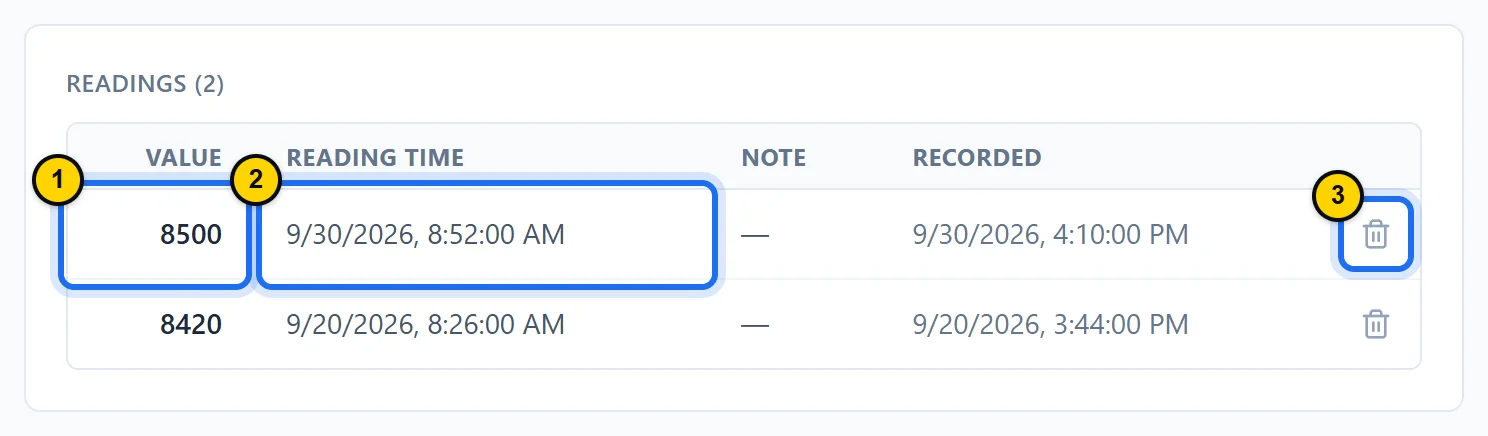
Fig. 7.4Readings from newest to oldest: the time a value was read and the time it was entered are shown separately.Tap the screenshot to enlarge it. - Marker 1: The most recent reading: it sets the meter’s current value.
- Marker 2: Reading time: when the value was read; Recorded: when it was entered.
- Marker 3: The trash icon deletes a wrong reading; by default, the owner, admins and managers can use it.
TipA reading dated before the latest one joins the history without changing the current value. The record shows the 50 most recent readings. For a longer history or a usage chart in a spreadsheet, export the readings for the period you need from Reporting › Export, Meter readings card (lesson 8).
Step 6: Trigger a work order based on usage
On the meter’s record, in the Automations section, click Create an Automation (Business plan): the Meter threshold crossed trigger and the meter 1 are already selected. Keep the default comparator, Increases by (since the last trigger). Enter the increment, for example 500 2: the screen shows the value of the next trigger. In the Create a work order action, enter the Work order title 3 and set Work type to Preventive. Click Create automation: each time a reading reaches the threshold, a work order is created on the meter’s asset.
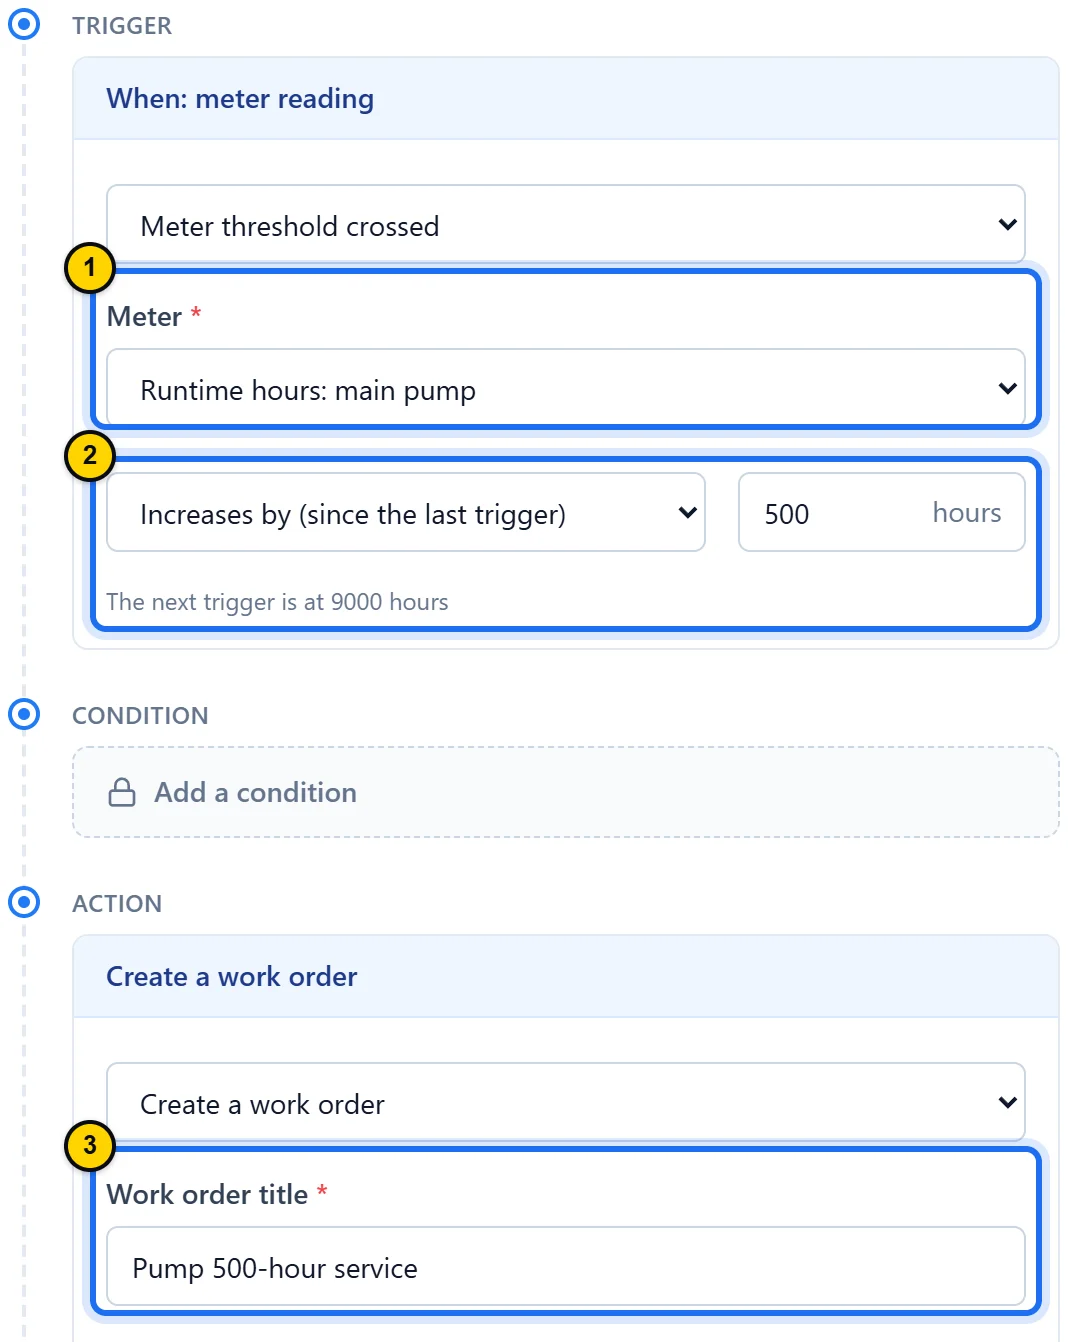
Fig. 7.5A service every 500 hours, counted from the last trigger.Tap the screenshot to enlarge it. - Marker 1: Meter: already selected when you create the rule from the meter’s record.
- Marker 2: Increases by (since the last trigger) and the increment: the screen shows the next trigger.
- Marker 3: Work order title: the title of each work order the rule creates.
TipName the rule in the field at the top: Create automation stays grayed out until you do. The Condition section is locked on every plan: leave it empty. Check Only create if the previous work order generated by the automation is closed so two services never pile up. A comparator such as Is greater than or equal to fires only once, when the threshold is crossed. By default, only the owner, admins and managers can create automations; the 30-day free trial includes them.
Good to know
- Read meters at regular intervals, for example at the end of each shift: an automation only fires when a reading reaches its threshold, so infrequent readings delay the work.
- To organize reading rounds, the Create a work order to take a meter reading button on the record opens a new work order form that is already titled and linked to the right asset.
- A Meter reading field in a procedure keeps the value on the work order: it does not update the meter. Log the reading on the meter as well.
- Preventive Maintenance plans are scheduled by date (lesson 6). For usage-based maintenance, use an automation, as in step 6.
- A meter that still drives an automation or a preventive plan cannot be deleted: detach or delete those rules first.
Key takeaways
- A meter is created with a name and a unit, linked to the asset it measures.
- Each reading, logged on the web or a phone, joins the history; the most recent one sets the current value.
- On the Business plan, an automation creates the work order as soon as a reading reaches the threshold.