Schedule preventive maintenance for your assets
One task, one schedule, one technician: Maint Vision creates each work order ahead of time and places it on the calendar.
What you will learn
- Create a preventive plan from an asset’s record.
- Set its frequency, technician and lead time.
- Predict when Maint Vision creates each work order: lead time, morning generation.
- Track due dates on the plan’s page and on the calendar.
Before you start
- Assets created under Assets (lesson 1): every plan is attached to an asset.
- An Owner, Admin or Manager role to create and edit plans (default role settings).
- The Pro plan, or the 30-day free trial, which includes it.
What it is for
Preventive maintenance services your machines on a schedule set in advance, instead of waiting for a breakdown. In Maint Vision, each preventive plan belongs to an asset: it describes the task, how often it repeats and who does it. Maint Vision then creates each work order a few days before it is due and places it on the calendar. All your team has to do is carry it out.
Key concepts
- Preventive plan: a recurring task attached to an asset. Each due date of the plan, or occurrence, becomes a work order.
- MP (Preventive maintenance) or MR (Regulatory maintenance): the MR badge flags checks required by regulations, such as the periodic statutory inspection of a forklift. Their work orders carry the Regulatory type.
- Frequency and interval: Monthly by date with an interval of 3 makes a quarterly plan; Monthly by weekday follows a set weekday, for example the second Tuesday of every month.
- Lead time: how many days before the due date the work order is created, 7 by default. Every morning, Maint Vision creates the work orders for the occurrences that fall within this window, on plans with Auto-generation checked.
- Schedule mode: with Fixed, dates follow the original schedule, even when a job runs late; with Floating, the next date counts from the day the previous work order is completed.
- Upcoming occurrence: a future due date whose work order does not exist yet. The calendar shows it with a dashed outline.
Step by step
Step 1: Open the asset’s record
A preventive plan is created from the machine’s record. In Assets, open the machine’s record, then scroll down to the Preventive maintenance section. Each row 1 is a plan, with its frequency, next due date and technician. The icons 2 generate a work order, show the plan on the calendar, open it, edit it or delete it. Click Add 3.
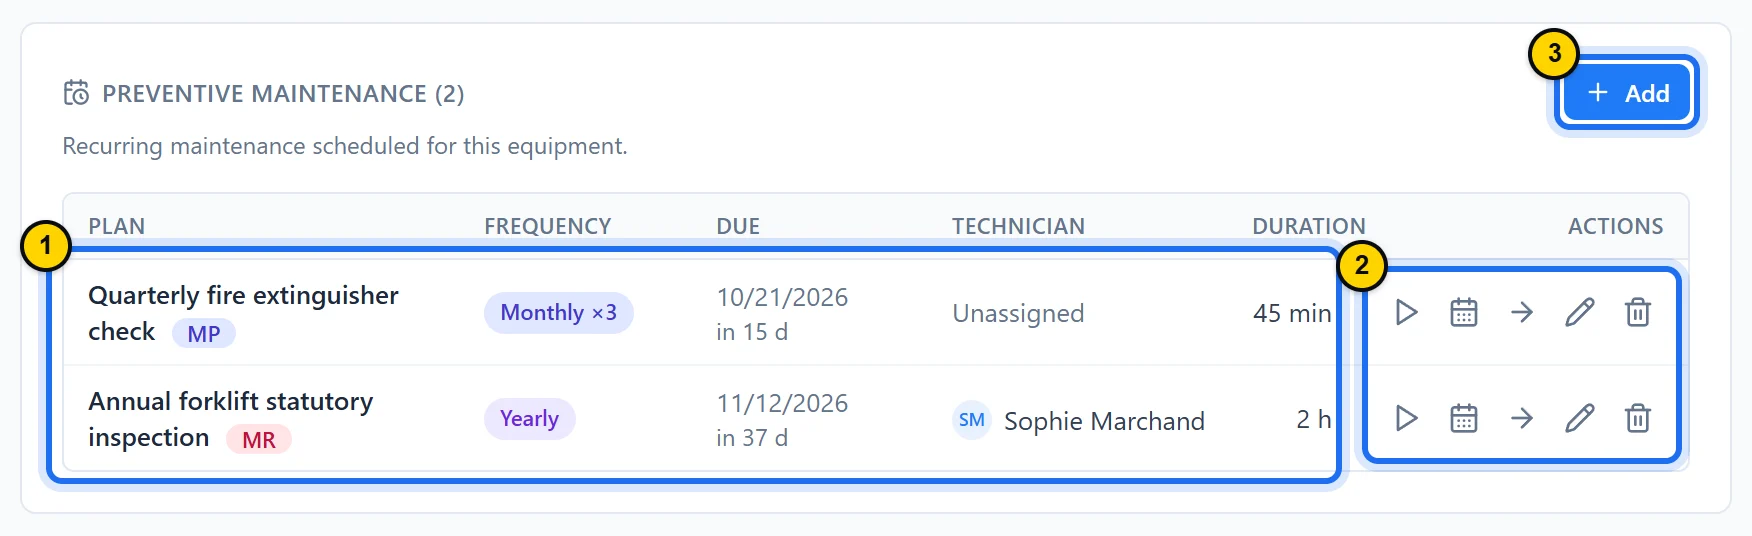
Fig. 6.1The machine’s plans, their due dates and the button to add one.Tap the screenshot to enlarge it. - Marker 1: One plan per row: its frequency, next due date, technician and duration.
- Marker 2: The plan’s actions: generate a work order, see it on the calendar, open it, edit it, delete it.
- Marker 3: Add: opens the form for a new plan.
TipThe Preventive Maintenance module has no create button: it brings together the plans of all your assets, in a register and a calendar (step 6).
Step 2: Describe the task and its schedule
In Task 1, enter the job the way your team names it: this text becomes the title of every generated work order. Pick the Maintenance type 2: MP for routine upkeep, MR for a regulatory check. Set the Frequency and the Every (interval) field 3: Monthly by date with an interval of 6 means one job every six months. Finally, enter the Next due date, the day of the first job: for a monthly or yearly frequency, Maint Vision writes the rule under the field, for example “On day 15, every 6 months.”
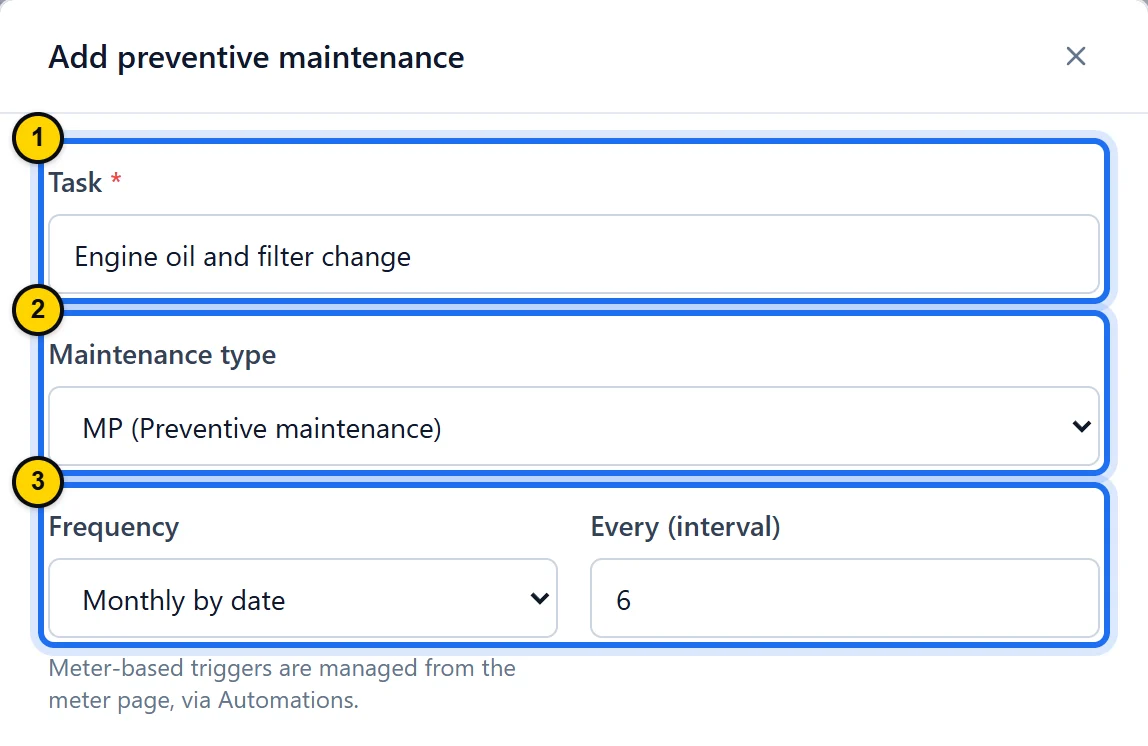
Fig. 6.2The task, its type and its schedule: here, an oil change every six months.Tap the screenshot to enlarge it. - Marker 1: Task: the plan’s name and the title of the generated work orders.
- Marker 2: Maintenance type: MP (Preventive maintenance) or MR (Regulatory maintenance).
- Marker 3: Frequency and Every (interval): how often the plan repeats.
TipMeter-based triggers, every 500 hours for example, are not set here: they go through Automations, from the meter’s record, on the Business plan (lesson 7).
Step 3: Set up the work order it will generate
Enter the Estimated time in minutes: it shows on each card in the calendar’s Week view. Choose the technician in Assigned to 1: every generated work order will be assigned to them, and they will get a notification. Attach a Procedure 2 if a checklist exists for this task (lesson 5). Set the Priority 3.
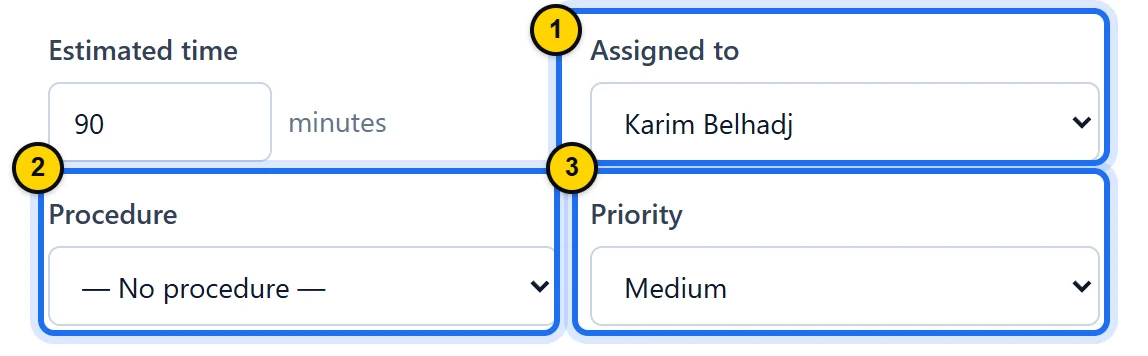
Fig. 6.3The technician, procedure and priority each work order will get.Tap the screenshot to enlarge it. - Marker 1: Assigned to: the technician who receives each work order.
- Marker 2: Procedure: the checklist to follow, attached to each work order.
- Marker 3: Priority: the priority of each generated work order.
TipA plan has a single technician. For a job that takes several people, add them to the generated work order.
Step 4: Set the lead time, then add the plan
Keep Fixed in Schedule mode 1 to follow a set calendar cadence, or choose Floating to count from the last completed job. The Lead time 2 sets how many days before the due date the work order is created: 7 by default. Leave Auto-generation 3 checked so Maint Vision creates the work orders for you. Leave Active checked too, then click Add.
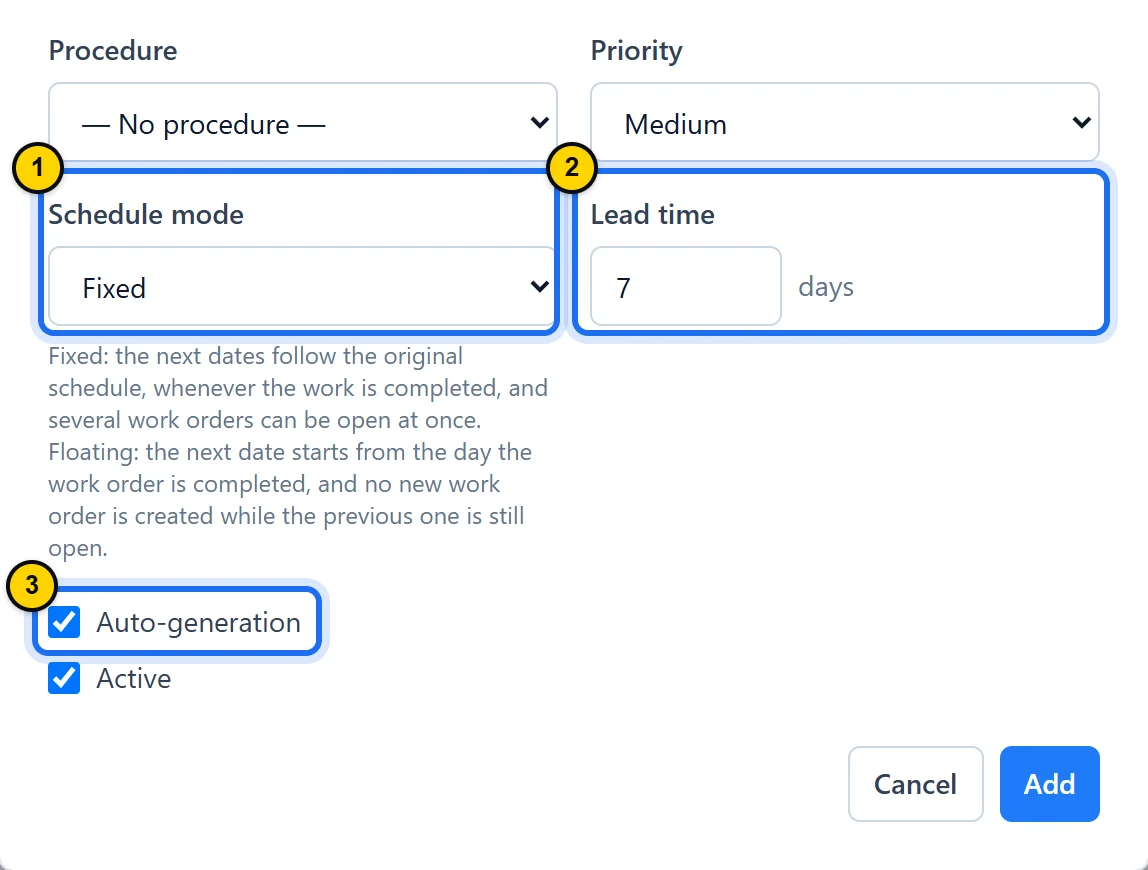
Fig. 6.4Fixed or Floating, the lead time, then the Add button.Tap the screenshot to enlarge it. - Marker 1: Schedule mode: Fixed or Floating, explained under the field.
- Marker 2: Lead time: in days, before each due date.
- Marker 3: Auto-generation: when it is unchecked, work orders are only created by hand.
TipUncheck Active to pause a plan without deleting it. When you turn it back on, the occurrences missed during the pause are skipped: it resumes at its next due date.
Step 5: Follow the plan from its page
Click the plan’s name to open its page: the Schedule card shows your settings. At the top of the page (to the right of the title on a wide screen), Generate WO 1 creates the work order for the next occurrence right away, then opens it; for a Floating plan, the previous work order must be completed first. Upcoming occurrences 2 lists the next dates; every morning, Maint Vision creates the work order for those that fall within the lead time. Generated work orders 3 then join the Work Orders module, where the technician carries them out like any other (lesson 2). On a new plan, this list stays empty until its first work order is generated.
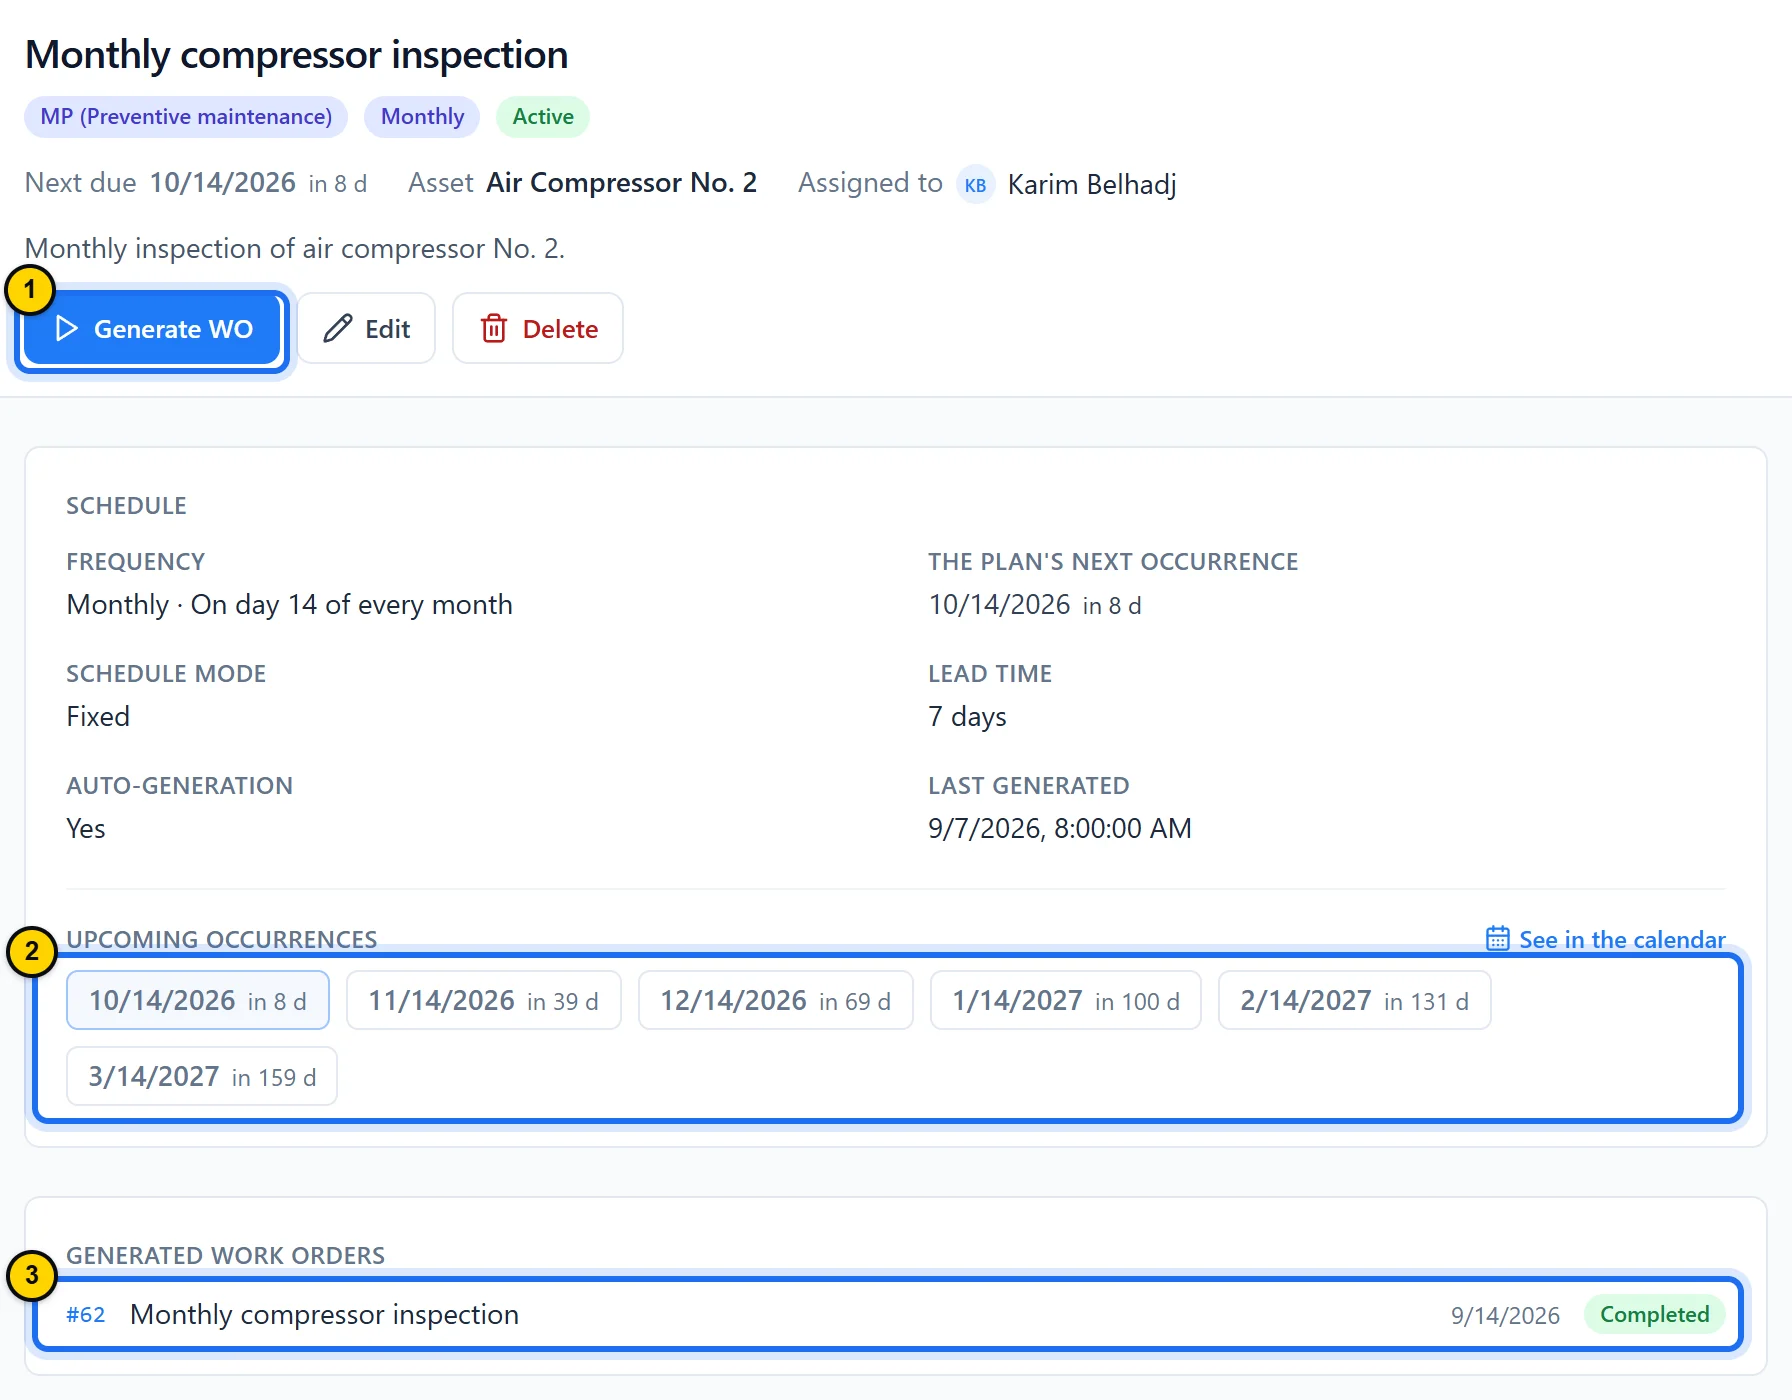
Fig. 6.5A plan that is already running: its schedule, its next dates and the work orders it has generated.Tap the screenshot to enlarge it. - Marker 1: Generate WO: creates the work order for the next occurrence right away, then opens it.
- Marker 2: Upcoming occurrences: the plan’s next dates.
- Marker 3: Generated work orders: what the plan has already produced, with their status.
TipEdit opens the plan’s full form: there you can set a Work order title different from the plan’s name, and a Work order description copied onto every work order.
Step 6: Manage due dates on the calendar
Open the Preventive Maintenance module: the By equipment register lists every plan and counts those overdue or due within 7 days. Click Calendar 1, then pick a period, from Week to Year. A solid card with a number is a work order that already exists 2; a dashed card marked Upcoming is an occurrence 3 whose work order does not exist yet. Click a card to open its details: for an occurrence, Generate now creates its work order. Drag a card to another day to reschedule it: moving an occurrence shifts the plan’s whole series, once you confirm.
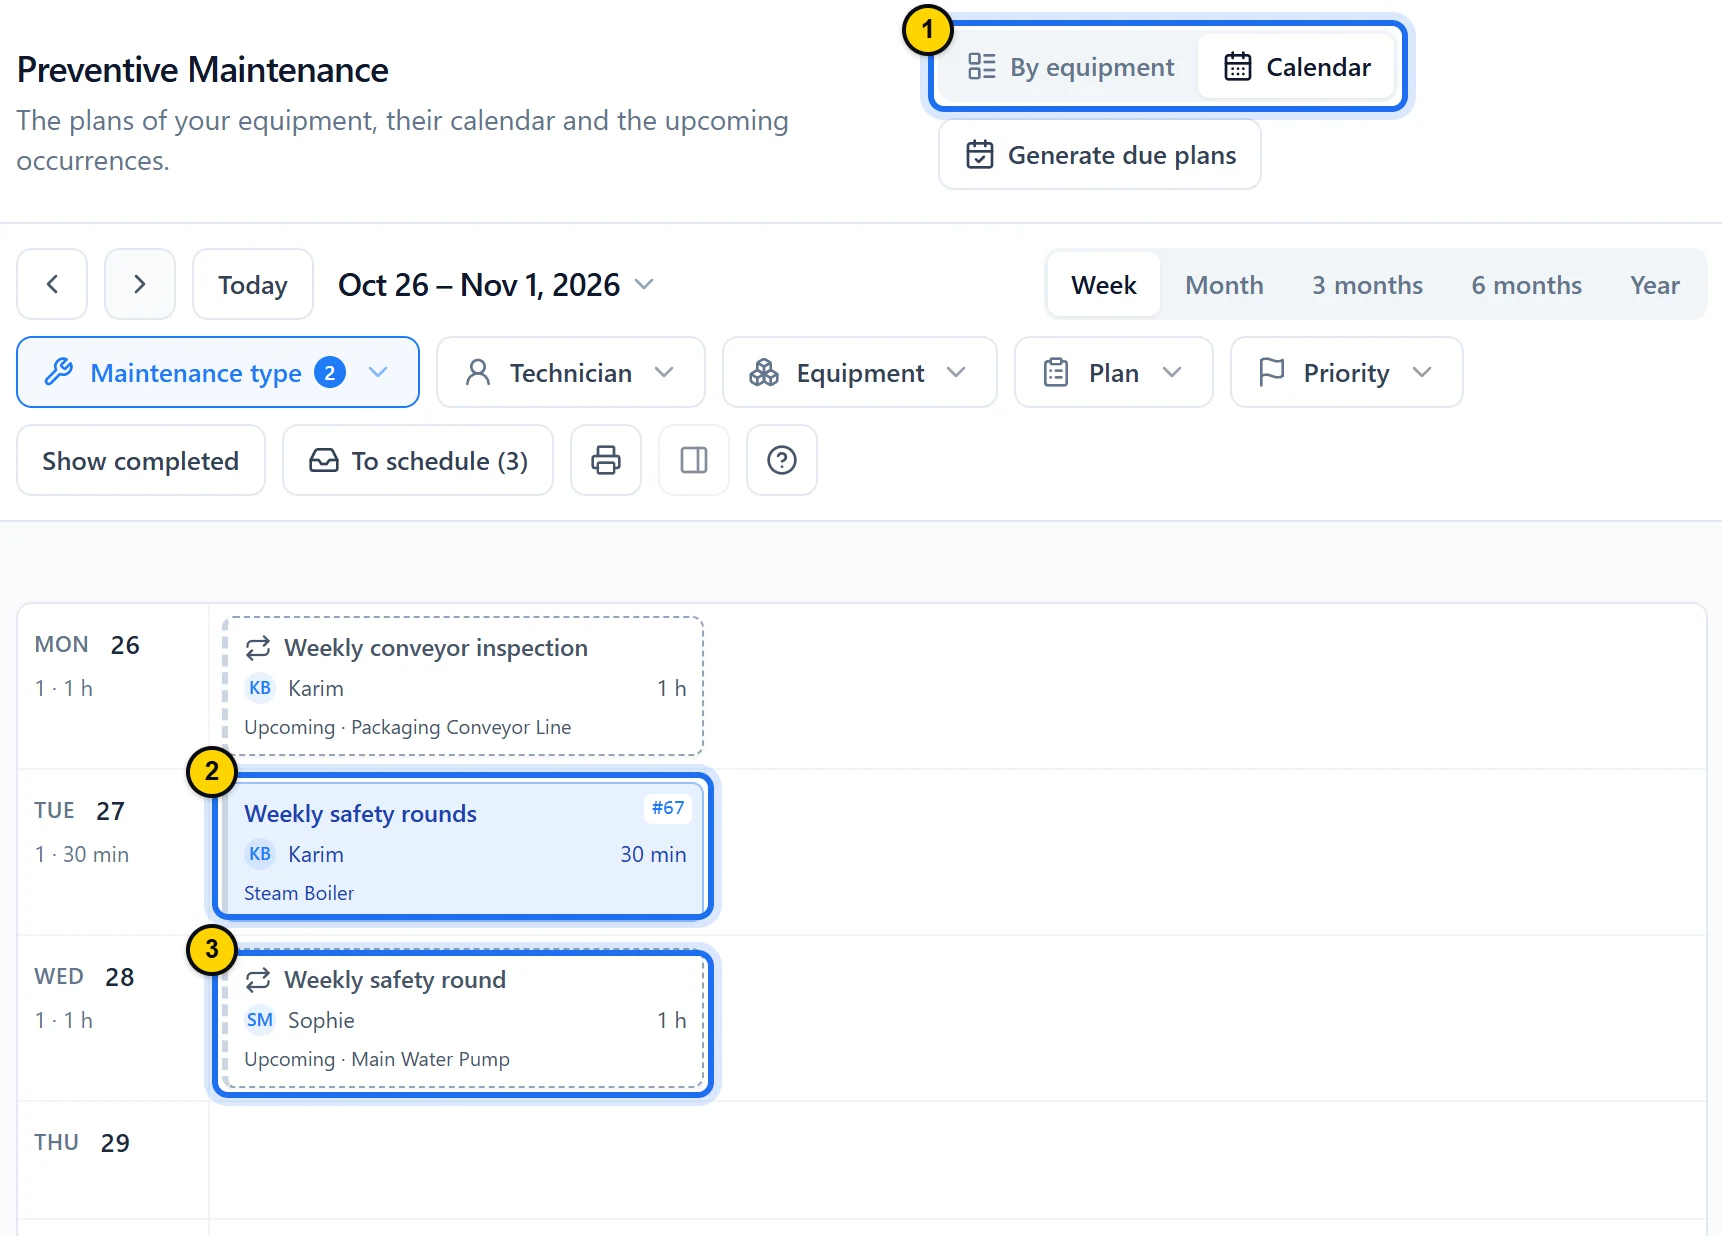
Fig. 6.6Existing work orders and upcoming occurrences, day by day (on a wide screen, the week shows as seven columns).Tap the screenshot to enlarge it. - Marker 1: By equipment or Calendar: the module’s two views.
- Marker 2: A work order that already exists, with its number, technician and duration.
- Marker 3: An upcoming occurrence, with a dashed outline: if Auto-generation is checked, its work order is created once it falls within the lead time.
TipDragging cards and generating work orders are reserved for the roles that manage plans: owner, admin and manager by default. Technicians can view the register and the calendar. This calendar only shows preventive and regulatory work: reactive jobs are scheduled under Work Orders (lesson 2).
Good to know
- Choose Floating for a task that depends on the time since the last job, such as lubrication; keep Fixed for a set date, such as a regulatory inspection.
- Set the Lead time to the time you need to prepare the job: ordering a part, booking a line shutdown. Too long, and work orders sit open well in advance.
- Right after creating your plans, click Generate due plans at the top of the module: it runs the morning generation right away.
- In the New Work Order form, a Work type of Preventive or Regulatory shows a Recurrence field. Picking one, with an Asset and a Due date, creates a plan on that asset when you save (MP or MR depending on the type): this work order becomes its first occurrence. You cannot add a recurrence to a work order that already exists.
- A plan carries no parts list: parts are recorded on the generated work order, when they are used (lesson 4).
Key takeaways
- A preventive plan is created on the asset’s record, with a task, a schedule and a technician.
- Maint Vision creates each work order before it is due, based on the lead time.
- The calendar shows generated work orders and upcoming occurrences.
Module overviewPreventive maintenance →Calendar & scheduling →