Create parts, track their stock and use them on work orders
Know what is on the shelf, what is already committed to a job and when to reorder.
What you will learn
- Create a part with its location, starting stock and reorder point.
- Use a part on a work order and tell reserved from consumed.
- Read the on-hand quantity, the available quantity and the Needs restock badge.
- Correct stock with a reason and find every movement in the history.
Before you start
What it is for
A part that is missing on the day of the breakdown costs more than the part itself. Parts Inventory tells you what is on the shelf, what is already committed to a job and what to reorder. Every receipt, usage and correction leaves a dated line with its author. This lesson covers the basic inventory, available on every plan; Pro features are flagged along the way.
Key concepts
- On hand (shown as “in stock” on the part record): every unit sitting in your locations, including those already committed to a work order.
- Reserved: units logged on a work order that is not completed yet. They are still on the shelf, but spoken for.
- Available: on hand minus reserved. It is the number to check before you promise a part.
- Reorder point: when stock drops to this level, the part is flagged Needs restock. On the Pro plan, a minimum set per location takes over.
- Stock movement: every restock, work order usage (or its reversal) or adjustment writes a dated line with its change and author. A reason is required for an adjustment and optional for a restock.
- Roles, by default: storekeepers, managers, admins and the owner create parts and correct stock; technicians, managers, admins and the owner use them on work orders.
Step by step
Step 1: Create the part record
Open the Parts Inventory menu. Click New Part. So your technicians can find it, give it a clear Name 1: it is the only required field. Fill in the Unit cost: it feeds the cost of the work orders that use the part. To be warned in time, set the Reorder point 2: when stock drops to that level, the part is flagged.
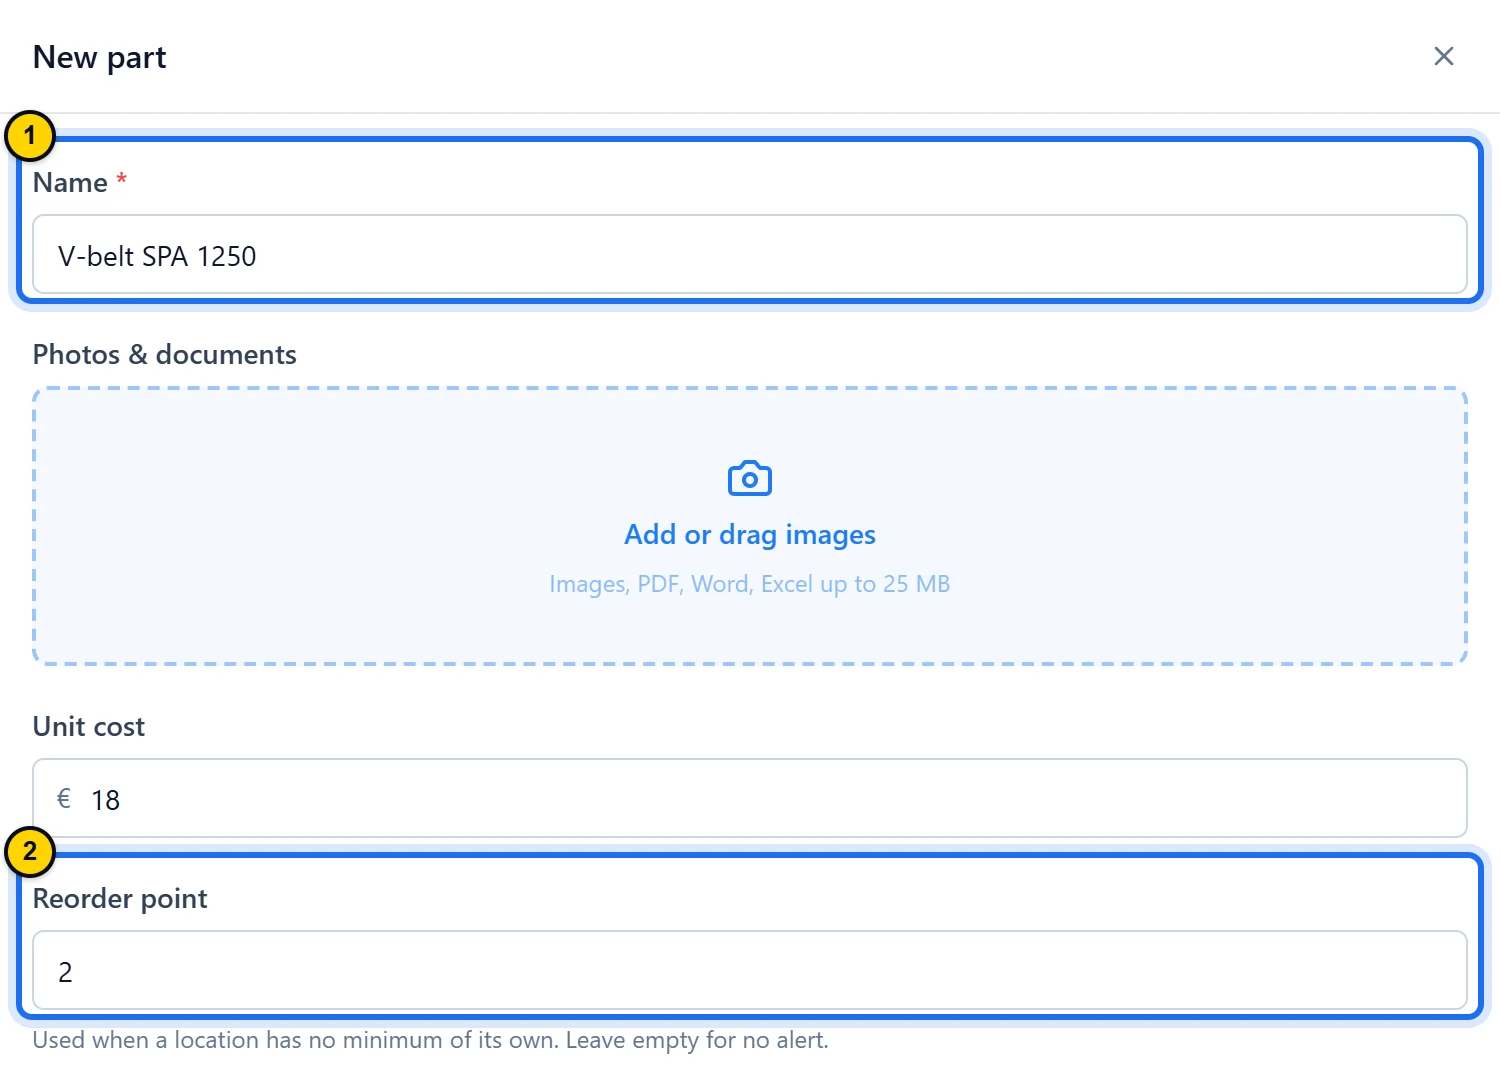
Fig. 4.1The top of the New part form: only the name is required.Tap the screenshot to enlarge it. - Marker 1: Name: the only required field, and the one people search for.
- Marker 2: Reorder point: at this stock level, the part is flagged.
TipMake sure the part does not already exist before you create it: a part that has ever held stock can no longer be deleted (its name and references stay editable with Edit).
Step 2: Store it and link it to its equipment
Further down the form, pick the Location where the part is stored 1. In Units, enter the quantity on the shelf 2: that is the starting stock. To find a machine’s parts later, check the Equipment that uses this part 3. The Zone, Min and Max columns only appear on the Pro plan and above. Click Create part.
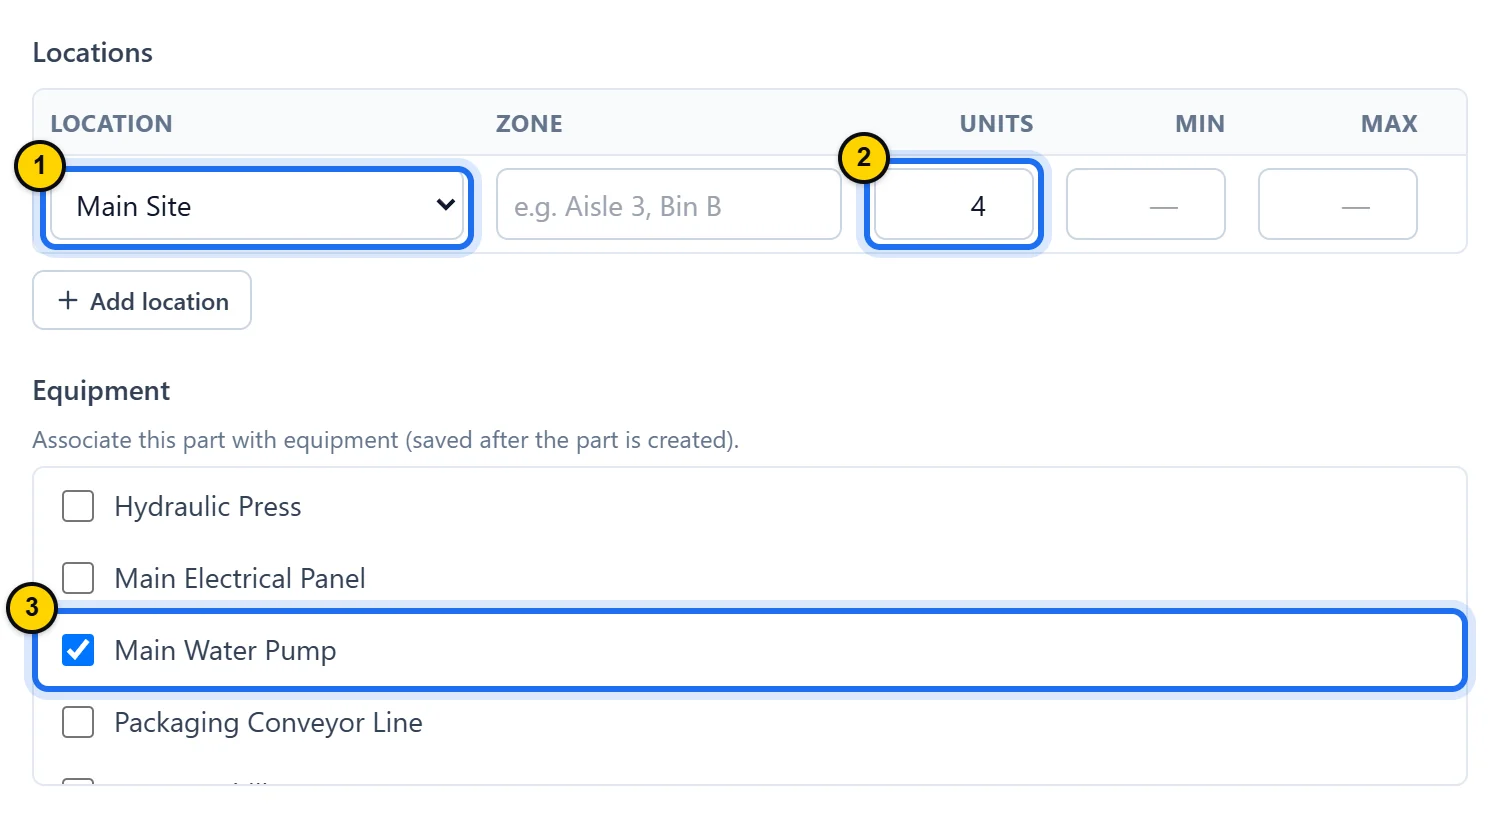
Fig. 4.2Location and starting stock, then the equipment that uses the part; without the Pro plan, the table has no Zone, Min or Max columns.Tap the screenshot to enlarge it. - Marker 1: Location: where the part is stored.
- Marker 2: Units: the starting stock at this location.
- Marker 3: The checked equipment: the part is linked to it as soon as it is created.
TipWithout a location, the units you type are not saved. Stored in several places? Add location adds one row per location. Part already created? Link it from its record with Add equipment.
Step 3: Use the part on a work order
In the work order, open the Parts tab 1. Click Use part 2. Pick the part and the quantity; the list shows what is available for each part. Confirm with the Use part button in the window. The line appears as Reserved 3: the units stay on the shelf, but they are no longer available to another work order.
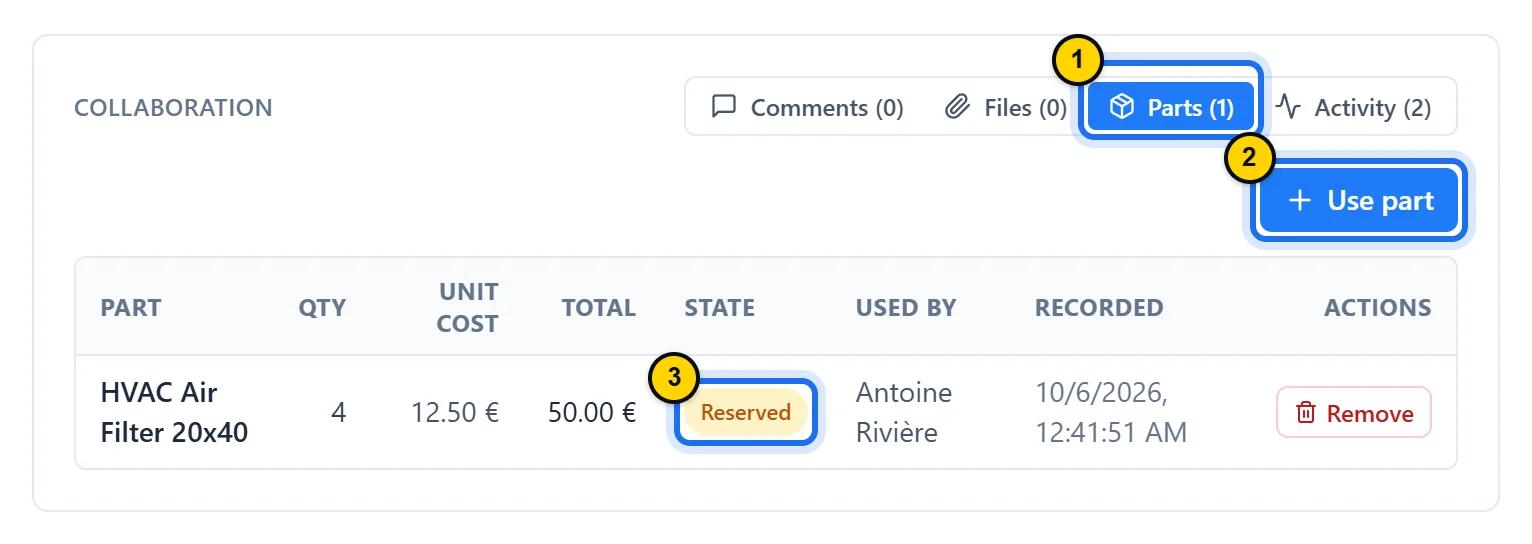
Fig. 4.3Logged on an open work order, the part is reserved: it only leaves stock when the job is completed.Tap the screenshot to enlarge it. - Marker 1: The work order’s Parts tab.
- Marker 2: Use part: logs a part and its quantity on the work order.
- Marker 3: Reserved: the work order is not completed, so the units are still in stock.
TipWhen the work order moves to Completed, the units leave stock and the line turns Consumed. If units are missing at that point, Maint Vision will not let you complete the work order. Wrong quantity? Remove deletes the line: the reservation is released, or units already consumed go back into stock. Reopening a completed work order also sets its parts back to Reserved.
Step 4: Read the available stock
Go back to Parts Inventory and select the part. The big number, labeled “in stock,” is the quantity on hand, reservations included. The line below 1 subtracts the units reserved by active work orders: that is the available quantity, the only number you can safely promise. In the list, the Needs restock badge 2 flags a part whose stock has dropped to its threshold. On the part record, the same signal reads Low stock, or Out of stock when none are left.
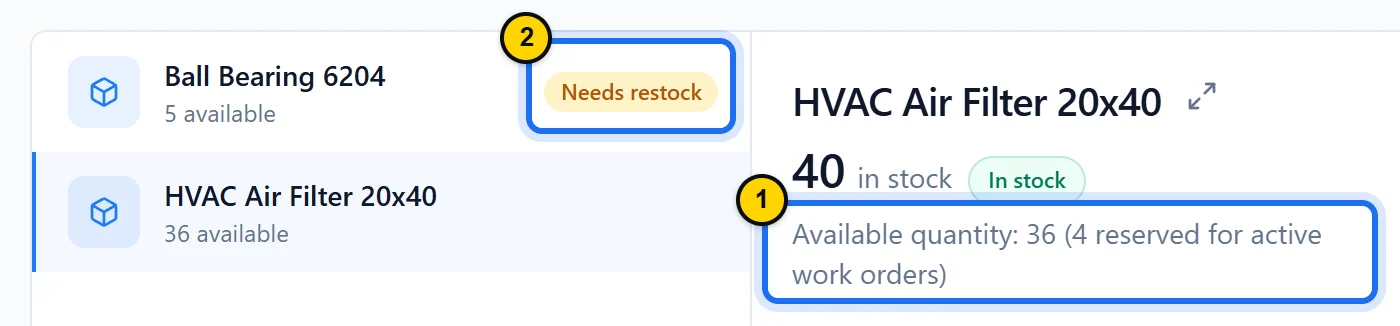
Fig. 4.440 in stock, 4 reserved by an open work order: 36 available.Tap the screenshot to enlarge it. - Marker 1: The available quantity: on hand minus reserved units.
- Marker 2: Needs restock: the bearing’s stock has dropped to its threshold.
TipThe badge is based on the quantity on hand, not the available quantity: a part can show In stock while every unit is already reserved. Check the available quantity before you promise a part.
Step 5: Restock and adjust the stock
When a delivery arrives, click Restock on the part record. Enter the Quantity received and the Location, then click Restock at the bottom of the window. After a count, click Adjust stock instead. Enter a negative Quantity change to remove units, a positive one to add them 1: the resulting stock shows right away, and it can never go below zero. The Reason is required 2: fill it in, then confirm with Adjust stock.
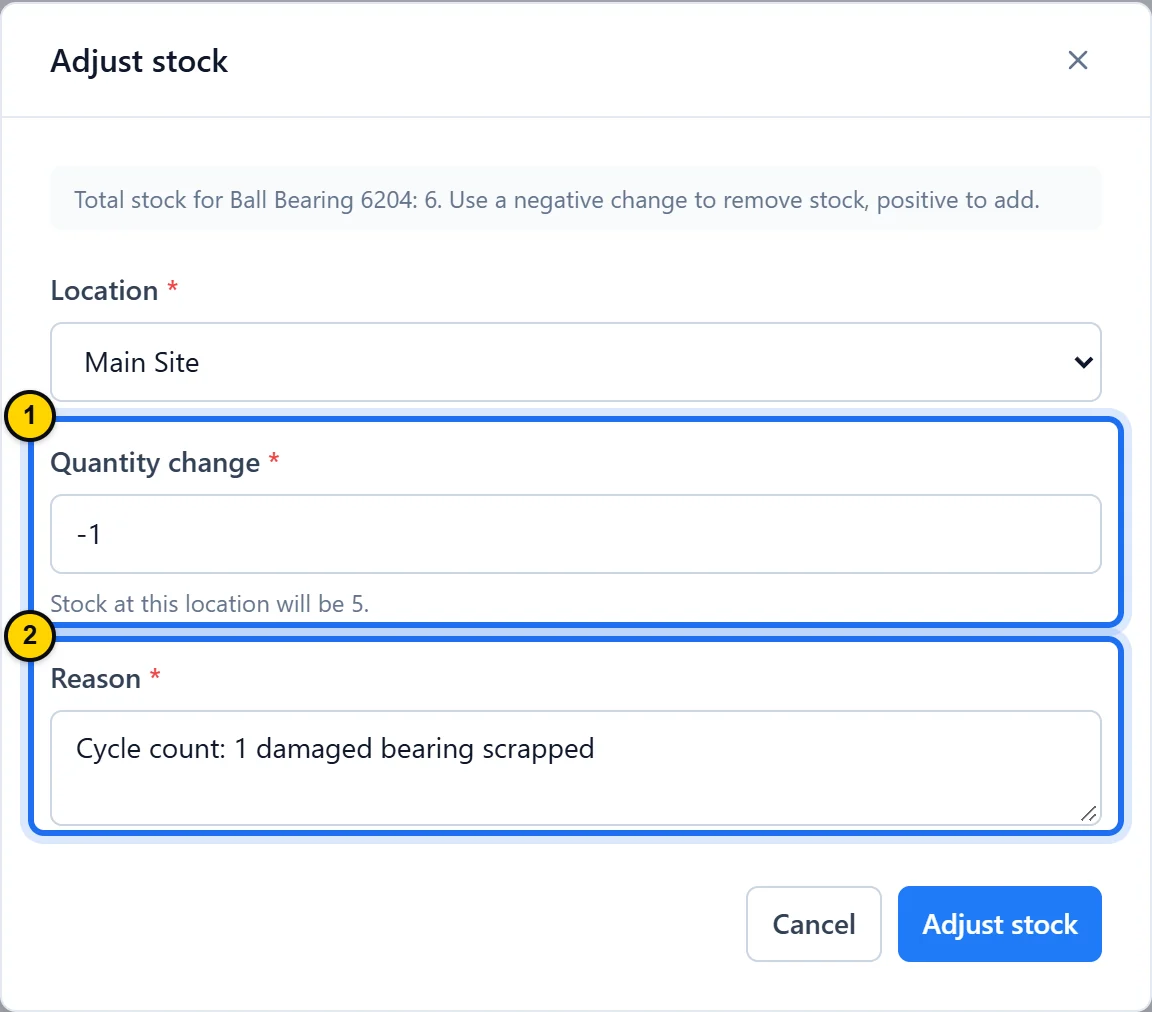
Fig. 4.5An adjustment removes 1 unit; the reason will explain the discrepancy.Tap the screenshot to enlarge it. - Marker 1: Quantity change: −1 removes one unit, and the line below shows the resulting stock.
- Marker 2: Reason: required; it appears in the part’s history, so the discrepancy still makes sense six months from now.
TipTo move units from one location to another without muddying the history, use Transfer (Pro plan).
Step 6: Review the history and reorder in time
For a wider table, open the record full screen (Open full screen icon, to the right of the name), then the History tab 1. Each line gives the movement type 2, the change, the resulting total quantity, the location, the Reason entered, if any 3, the originating work order when the movement comes from one, the author and the date. To see what to order, turn on the Needs restock filter in the parts list. A Low stock notification also alerts storekeepers, managers, admins and the owner as soon as a part drops to its threshold. Placing the order in Maint Vision, from the Purchase orders menu, is part of the Pro plan.
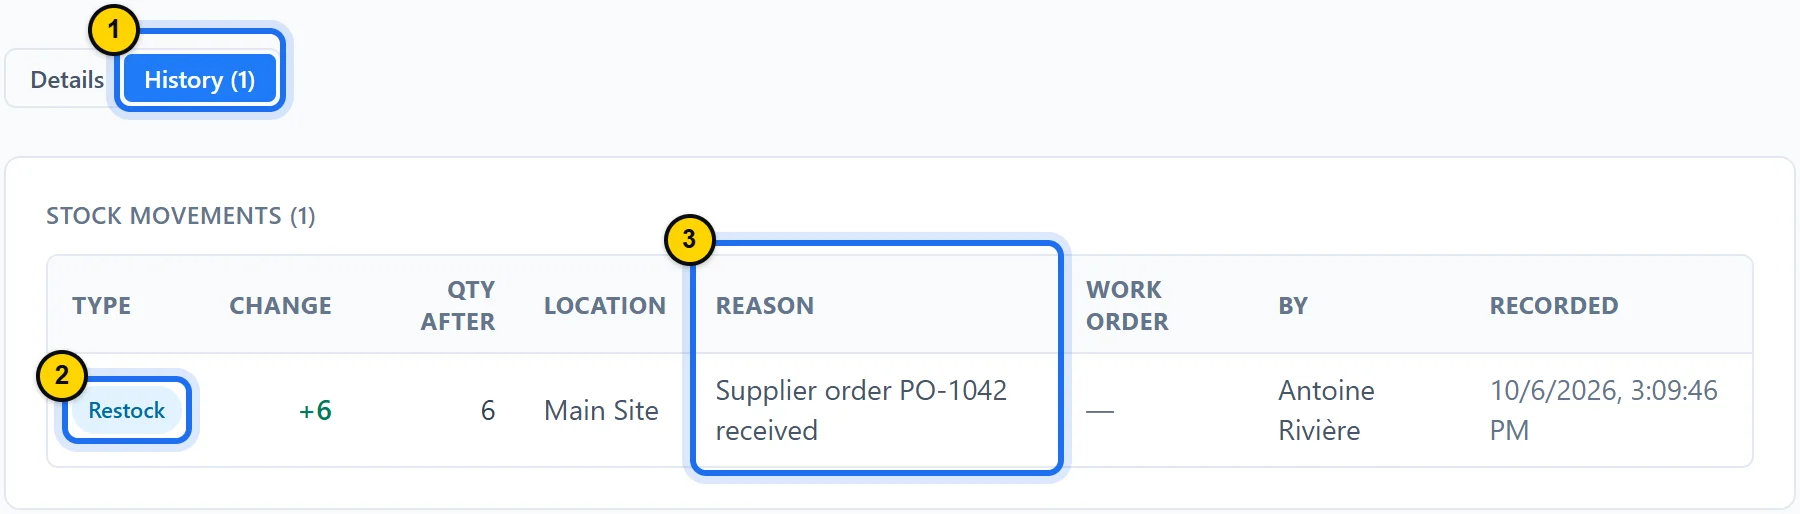
Fig. 4.6One line per movement: here, a supplier delivery, with the reason entered at restock.Tap the screenshot to enlarge it. - Marker 1: The History tab: every stock movement of the part.
- Marker 2: The movement type: here, a Restock.
- Marker 3: The Reason entered with the restock: it tells where the parts came from.
TipThe starting stock entered at creation also shows in the history: as an Adjustment for the first location and as a Restock for each location you added.
Good to know
- Start with your critical parts, the ones whose absence stops a machine: a few accurate records beat a complete but approximate inventory.
- Already have your parts list in a spreadsheet? An owner or admin imports it all at once from the settings (General page, Import data section, Parts Inventory tile): click Download the template, copy your list into it without renaming the headers, save the file as “CSV UTF-8,” then select it; Check the file flags the rejected rows before anything is saved.
- The asset record does not list its parts: to see a machine’s parts, use the Equipment filter in the inventory.
- The QR code on the part record can be printed: click it, then Print, and stick the label on the bin.
- The Vendor field lists the vendors in your directory; creating vendors is part of the Pro plan.
Key takeaways
- A useful part record has a name, a location, a starting stock and a reorder point.
- Logged on a work order, a part is reserved, then consumed when the work order is completed.
- Every restock, usage and adjustment leaves its own line in the history.
Module overviewParts & inventory →