Create, assign and close a work order
From a reported problem to validated work: every step of a maintenance job.
What you will learn
- Create a work order linked to the right asset.
- Assign the work to one or more people, with a due date and a priority.
- Track progress through statuses and the time, costs and parts logged.
- Close the job and validate the completed work.
Before you start
- Lesson 1, “Assets”: your assets are set up.
- The people who will do the work have an account (the Users & Teams menu); the free plan is limited to 2 users, requesters not included.
What it is for
A work order describes a maintenance job: what to do, on which asset, by whom and by when. You create it by hand or from a maintenance request (lesson 3); a preventive maintenance plan (Pro plan, lesson 6) or an automation (Business plan) can also generate it. It then keeps track of everything that happens: statuses, time spent, costs, parts and comments. Kept up to date, it builds up the asset’s history, which you will rely on for the next diagnosis.
Key concepts
- Status: Open, On hold, In progress or Completed. Moving to “In progress” records the start time; moving to “Completed” records the end time.
- Type and priority: the type (Reactive by default, Preventive, Regulatory or Other) says what kind of work it is; the priority (None, Low, Medium or High) says how urgent it is.
- Assignment: one or more people, in-house or contractor accounts, never a team. Companies checked under Contractors are for tracking only and get no access. You add these companies under Vendors & Contractors (Pro plan).
- Roles: by default, the Owner, Admin and Manager roles assign, schedule, create preventive work and validate. A Technician creates work orders (they are then assigned to them automatically) and carries out the ones assigned to them; a Contractor account carries out the ones assigned to it; a Viewer can only view them.
- Validation: a manager confirms that a completed work order has been checked. It is not a fifth status: the work order stays “Completed.”
- Activity: every change (status, assignment, dates, time, parts) is logged automatically in the work order’s Activity tab.
Step by step
Step 1: Create the work order
A work order linked to its asset builds up that machine’s history. In Work Orders, click New Work Order at the top right. Describe what needs to be done in the title 1: it is the only required field. Add a Description and photos if they help whoever does the job. Further down, choose the Asset 2: the Location field, a little higher up, then fills in from the asset’s own location 3.
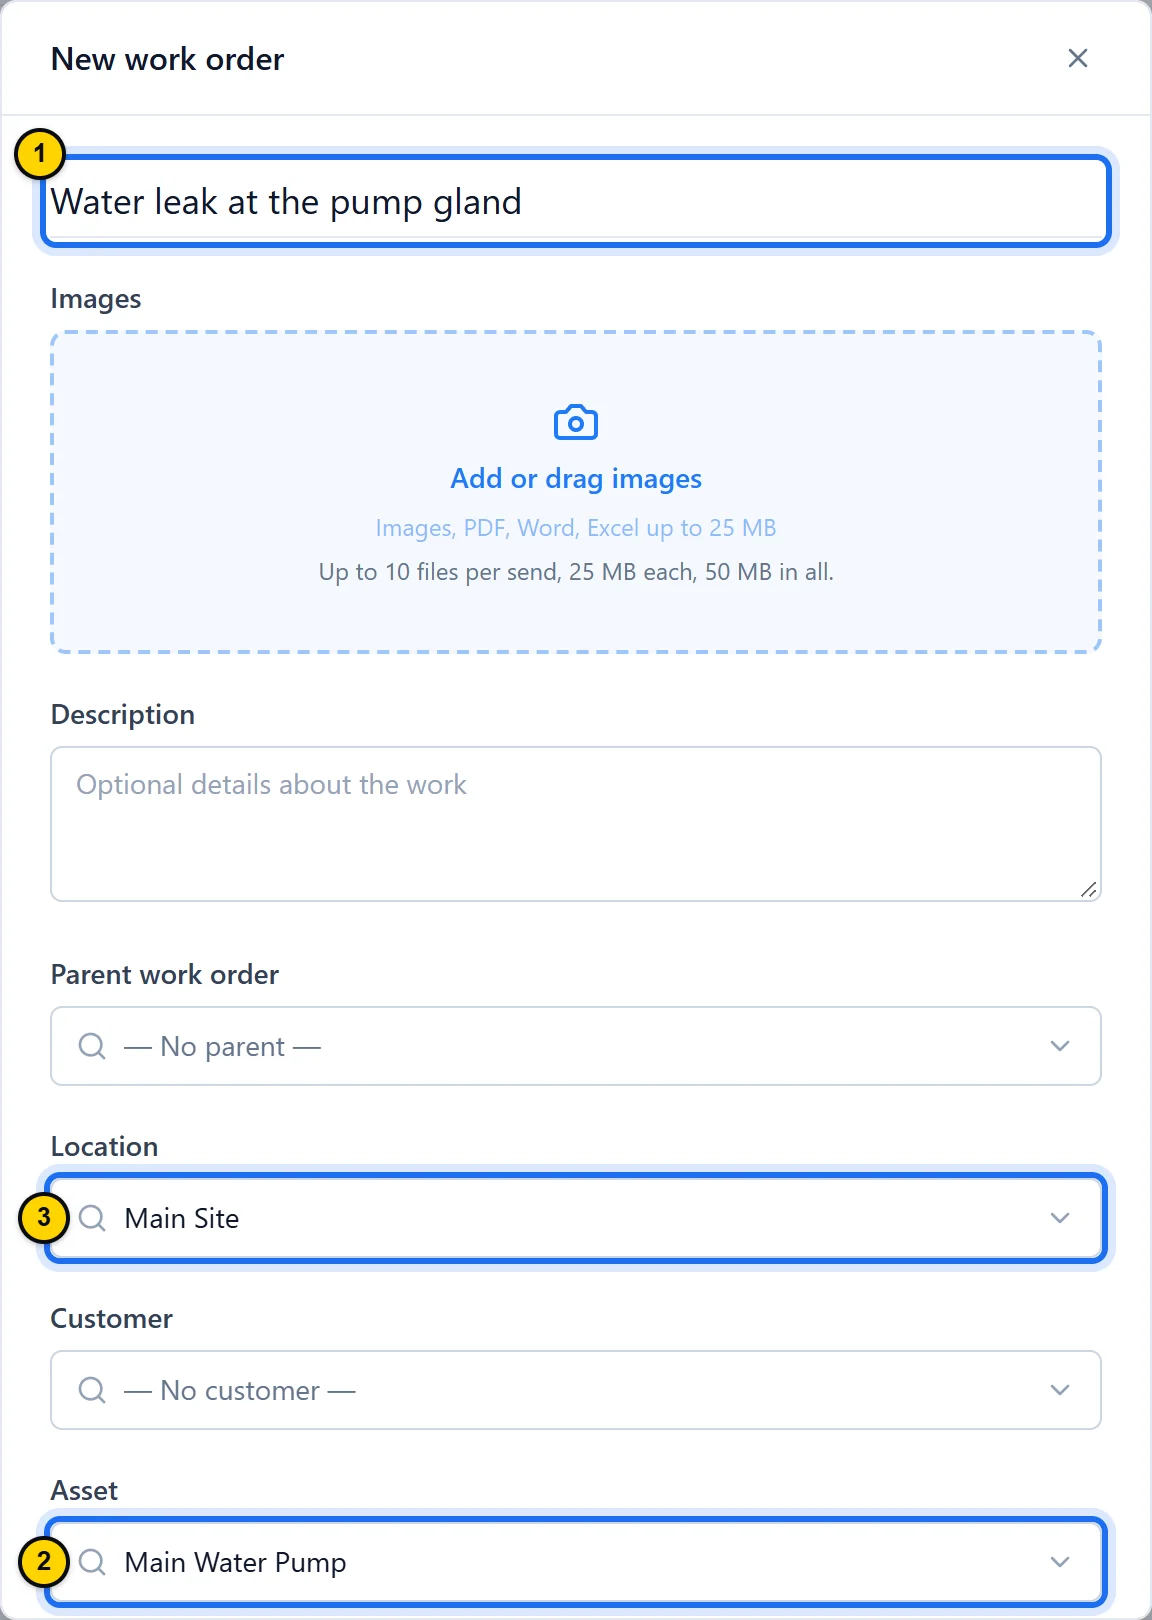
Fig. 2.1The top of the form: a title, then the asset, whose location is picked up automatically.Tap the screenshot to enlarge it. - Marker 1: The title: what needs to be done, in one sentence. It is the only required field.
- Marker 2: The Asset the job is about.
- Marker 3: The Location, taken from the asset’s location unless you change it.
TipFrom the To do view, the form opens to the right of the list; from the List, Calendar and Workload views, it opens in a window. The fields are the same.
Step 2: Assign and schedule
Assigning someone, setting a due date and choosing a priority keep a work order from being forgotten. In Assign to, pick one or more people 1: they are notified and find the work order in their list, on the web and in the mobile app. Fill in the Estimated duration (hours, then minutes) and the Due date. Choose the Priority 2; for a breakdown, the type stays Reactive. Click Create 3: the work order gets its number automatically.
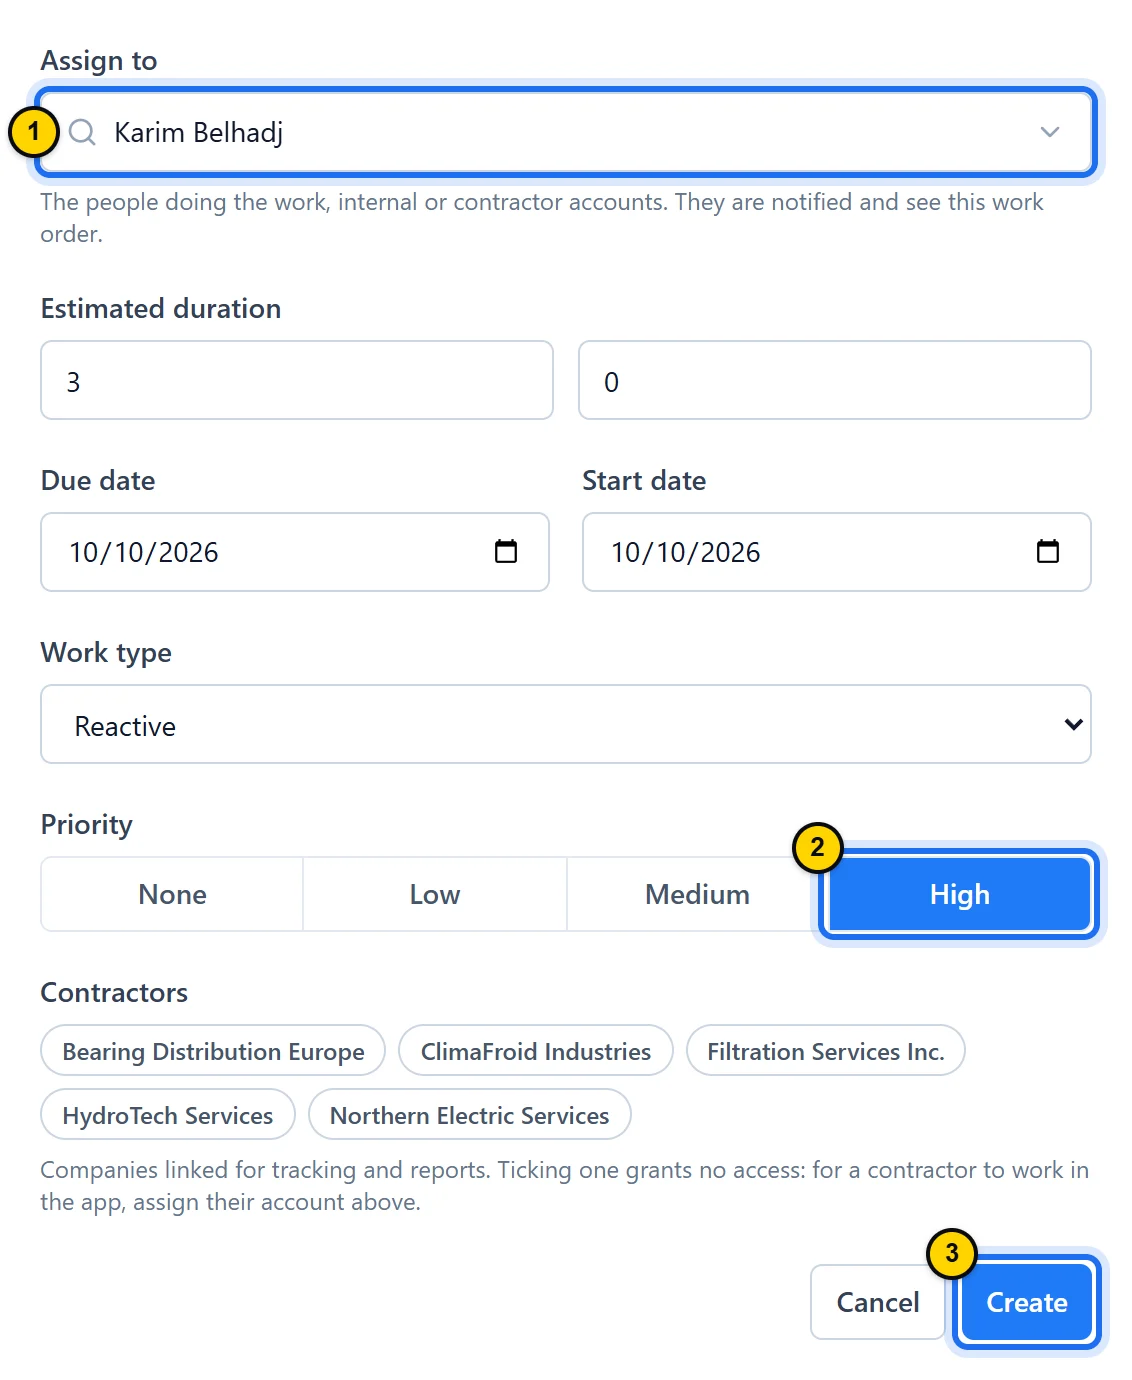
Fig. 2.2The bottom of the form: who does the work, by when and how urgently.Tap the screenshot to enlarge it. - Marker 1: Assign to: one or more people, in-house or contractor accounts. They are notified.
- Marker 2: The Priority, here High.
- Marker 3: Create saves the work order and gives it its number.
TipOnly roles that hand out work see the Assign to field. A work order created by a technician is assigned to them automatically; only those roles (by default: owner, admins and managers) can then add someone or hand it to someone else.
Step 3: Track the team’s workload
Once the work is handed out, keep an eye on the whole team’s load. The default view, To do, sorts work orders into three groups, Assigned to me, Assigned to others and Unassigned, highest priority first. The Workload view adds up, for each person, the estimated hours of their work orders that are not completed 1 and counts their overdue ones 2. The Unassigned card groups work orders with nobody assigned; its active work orders and estimated hours show the work still waiting for someone 3.
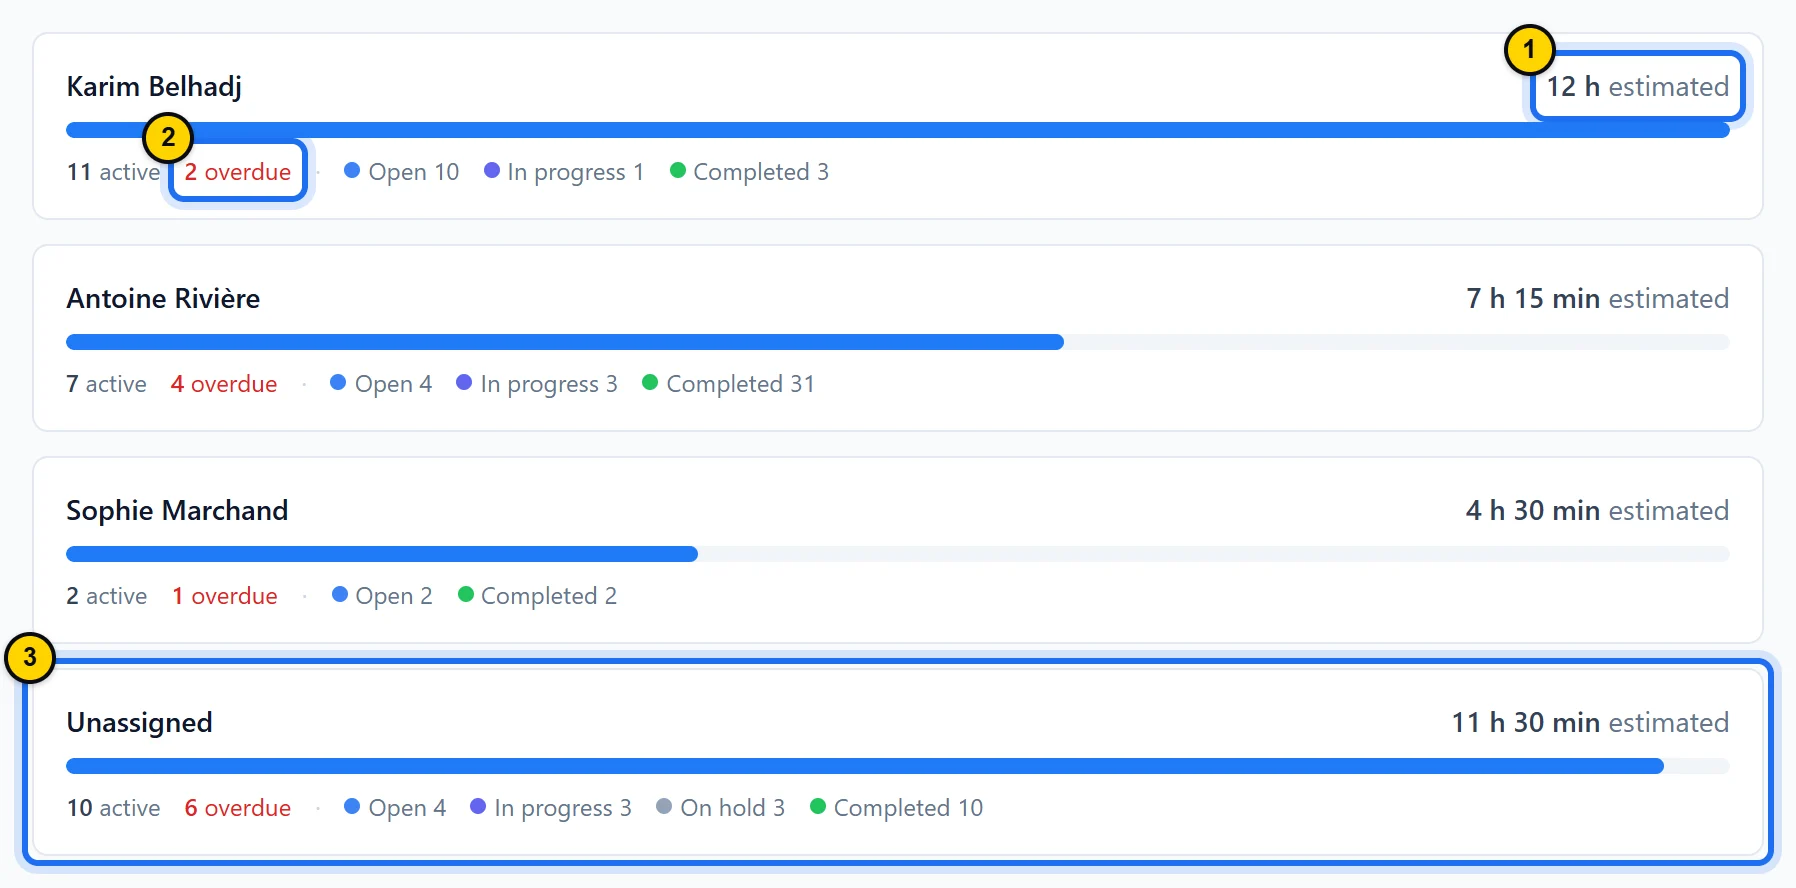
Fig. 2.3The Workload view: everyone’s planned hours and overdue work, plus the work with nobody assigned.Tap the screenshot to enlarge it. - Marker 1: The estimated hours of the person’s work orders that are not completed.
- Marker 2: Their overdue work orders, in red.
- Marker 3: The Unassigned card: work with nobody assigned yet. As on every card, the status breakdown also counts completed work orders.
TipCheck Workload before assigning a new work order: it shows who is already busy. A technician sees only their own load there.
Step 4: Move the status forward
The status tells the whole team where the work stands. On the work order, the person doing the job clicks In progress when starting 1: the start time is recorded. In the mobile app, the Start work button at the bottom of the screen does the same. If they are waiting for a part or for access, they set the work order to On hold 2.
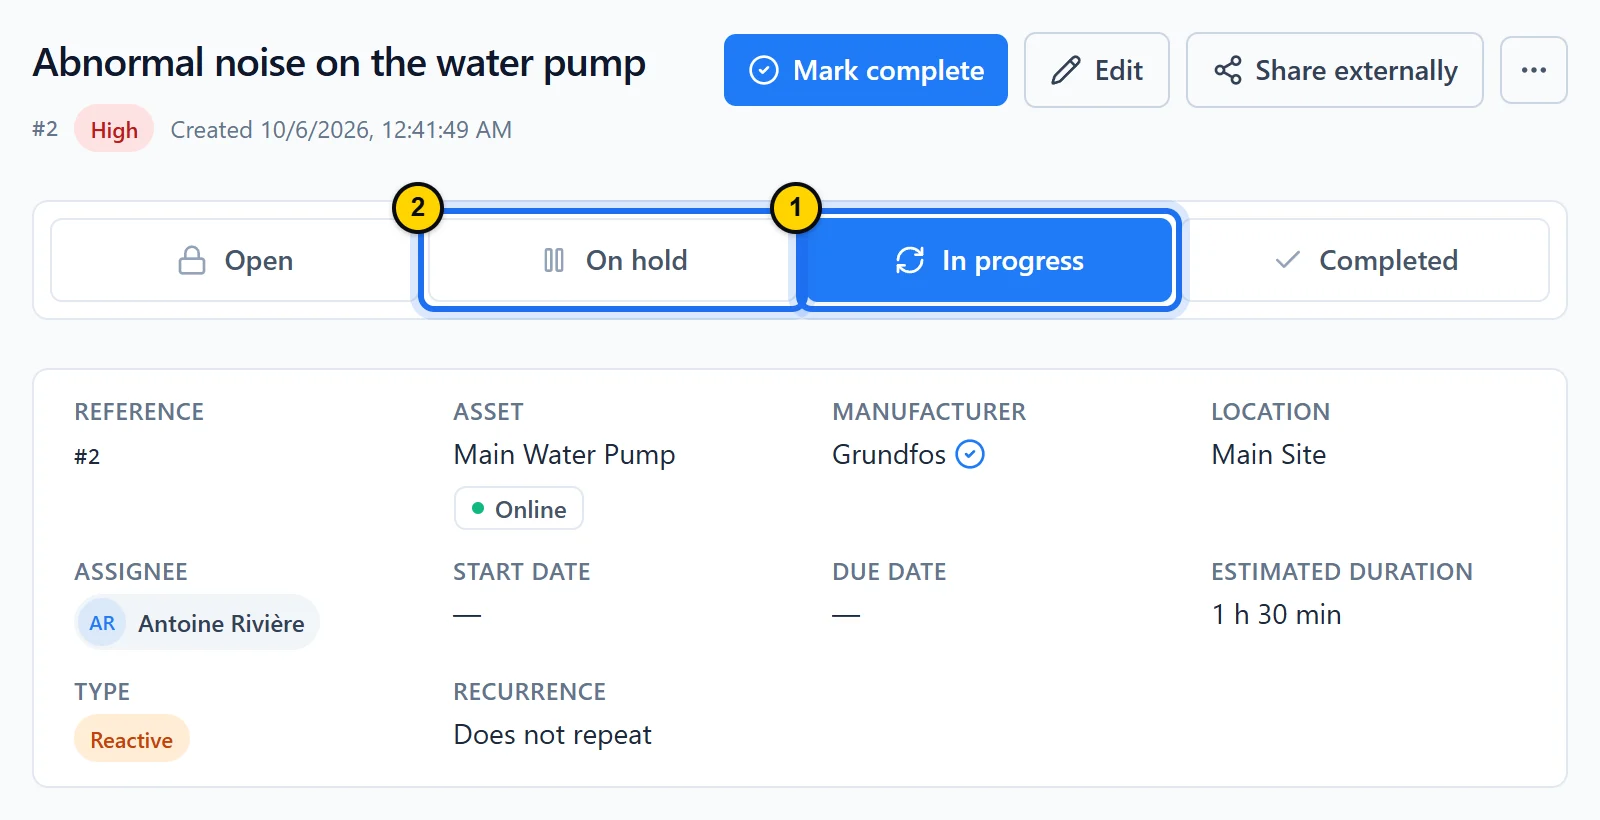
Fig. 2.4The status bar on the work order: one click moves it from one status to another.Tap the screenshot to enlarge it. - Marker 1: In progress: work has started and the start time is recorded.
- Marker 2: On hold: work is paused, for example while waiting for a part.
TipA Contractor account can change the status and log time on the work orders assigned to it, but never sees any amounts.
Step 5: Log time and costs
The real cost of a job builds up during the work, not afterward. Under Time & costs, click Add time to record the hours spent 1. Labor cost uses the hourly rate entered, or else the person’s own rate. Click Add cost for an outside expense, such as a subcontractor 2. The work order’s total updates with each entry 3.
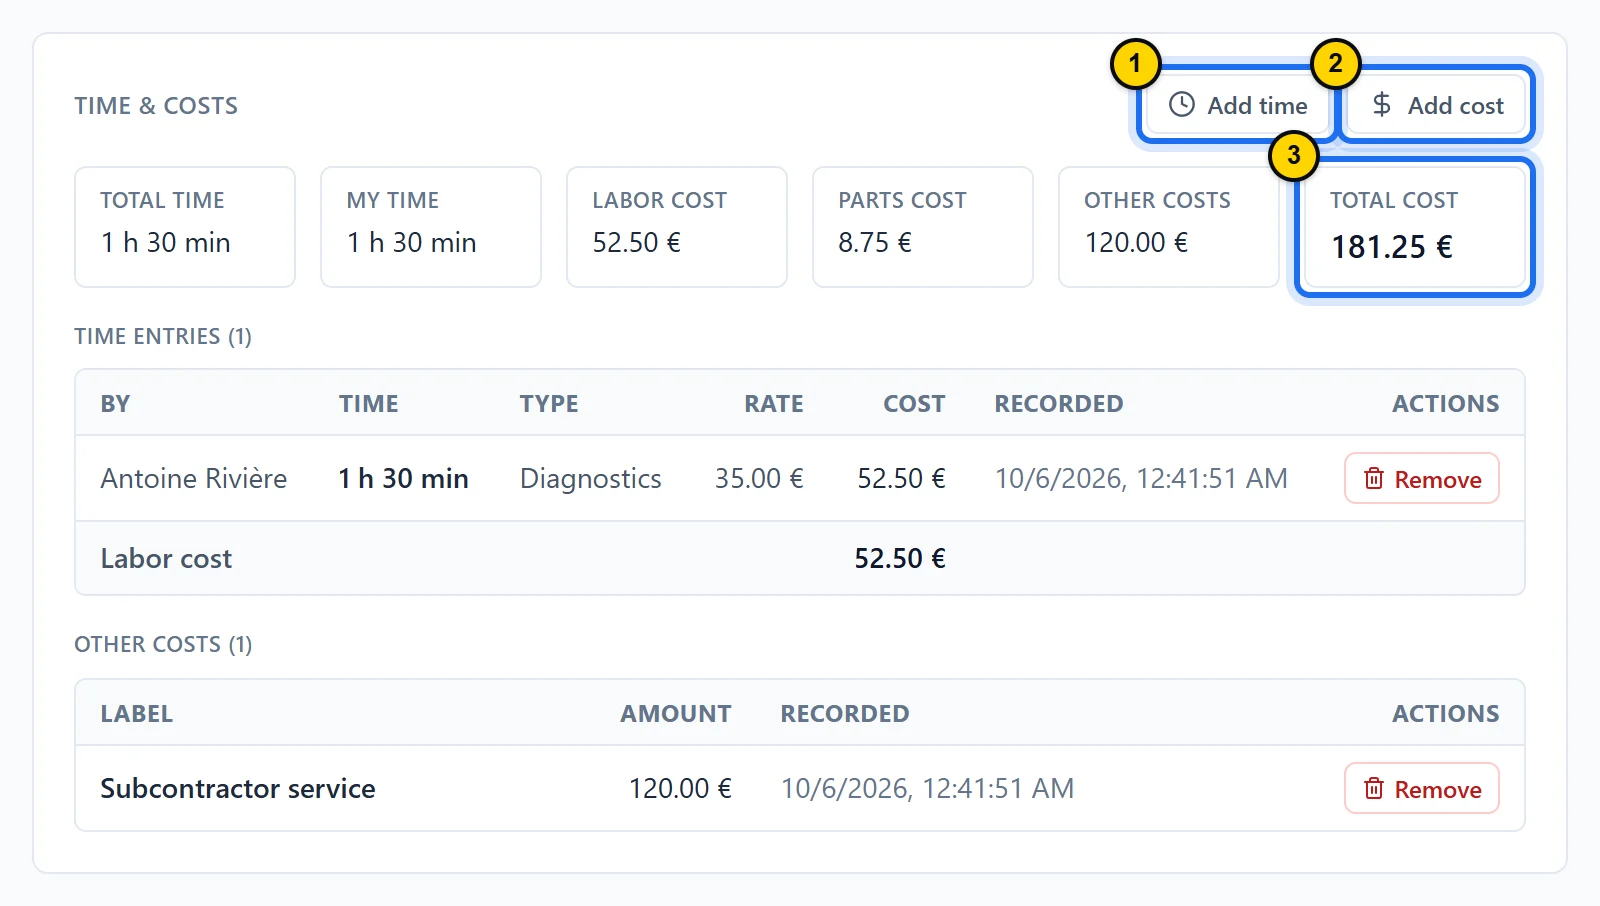
Fig. 2.5The Time & costs section: each entry adds to the job’s total cost.Tap the screenshot to enlarge it. - Marker 1: Add time: who the time is for (Logged for), the duration, a free-text type (for example “Diagnostics”) and, if needed, an hourly rate.
- Marker 2: Add cost: an expense other than labor and parts.
- Marker 3: Total cost: labor, parts and other costs added up.
TipLogging time for somebody else requires the right to hand out work; anyone who works on the job can always log their own.
Step 6: Record the parts used
Open the work order’s Parts tab 1. Click Use part 2. The part must already exist in Parts Inventory (lesson 4): while the inventory is empty, this button stays grayed out. Choose the part and its quantity in the window that opens. Until the work order is completed, the line stays Reserved 3: stock only goes down at completion.
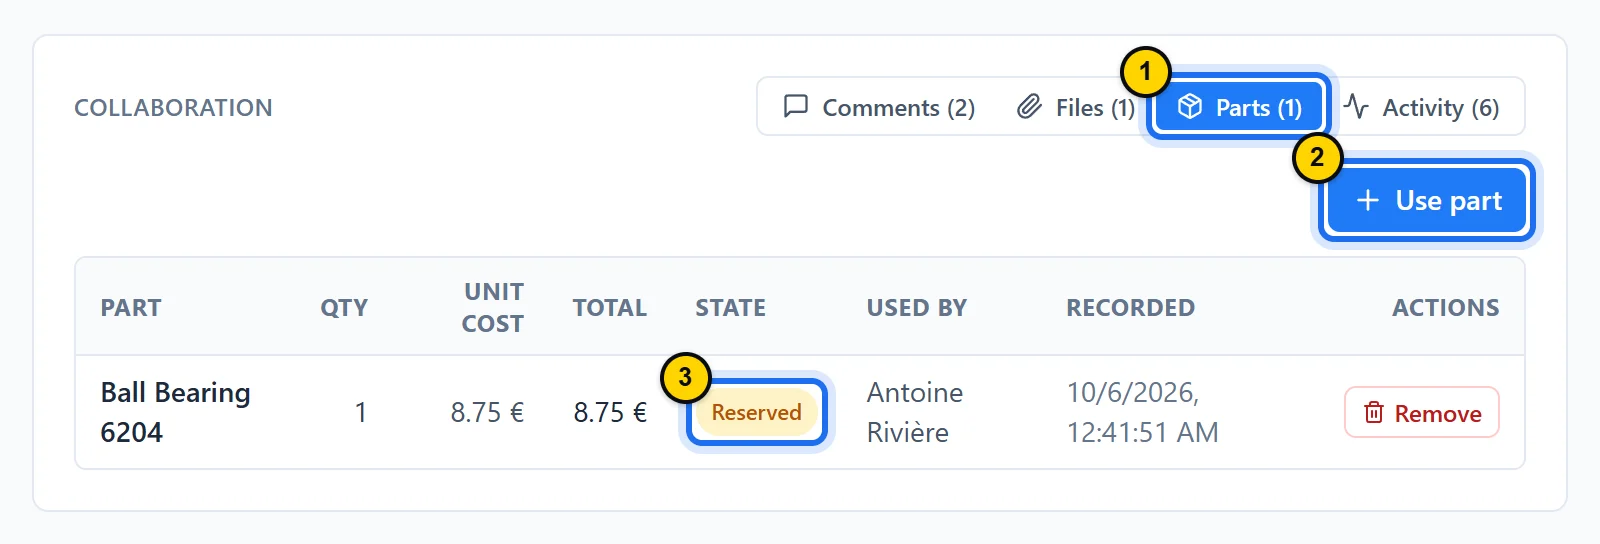
Fig. 2.6The Parts tab: each part used, its cost and its inventory state.Tap the screenshot to enlarge it. - Marker 1: The Parts tab in the Collaboration area.
- Marker 2: Use part: the part and the quantity set aside for the work order.
- Marker 3: Reserved: the part is held for the work order; it switches to Consumed at completion.
TipParts used count toward the work order’s cost and toward inventory tracking. Removing a line that is still reserved simply releases the reservation; removing a consumed part puts it back in stock.
Step 7: Complete, then validate the work
Completing locks in the actual duration; validating confirms the work was checked. When the job is done, the person doing it clicks Mark complete (in the mobile app, Mark as complete): the end time is recorded and reserved parts leave stock. The manager then opens the Done tab 1 of the To do view, where To validate lists the work to check 2. After reviewing it, they click Validate 3, adding a note if needed. The work order stays “Completed” and joins the asset’s history.
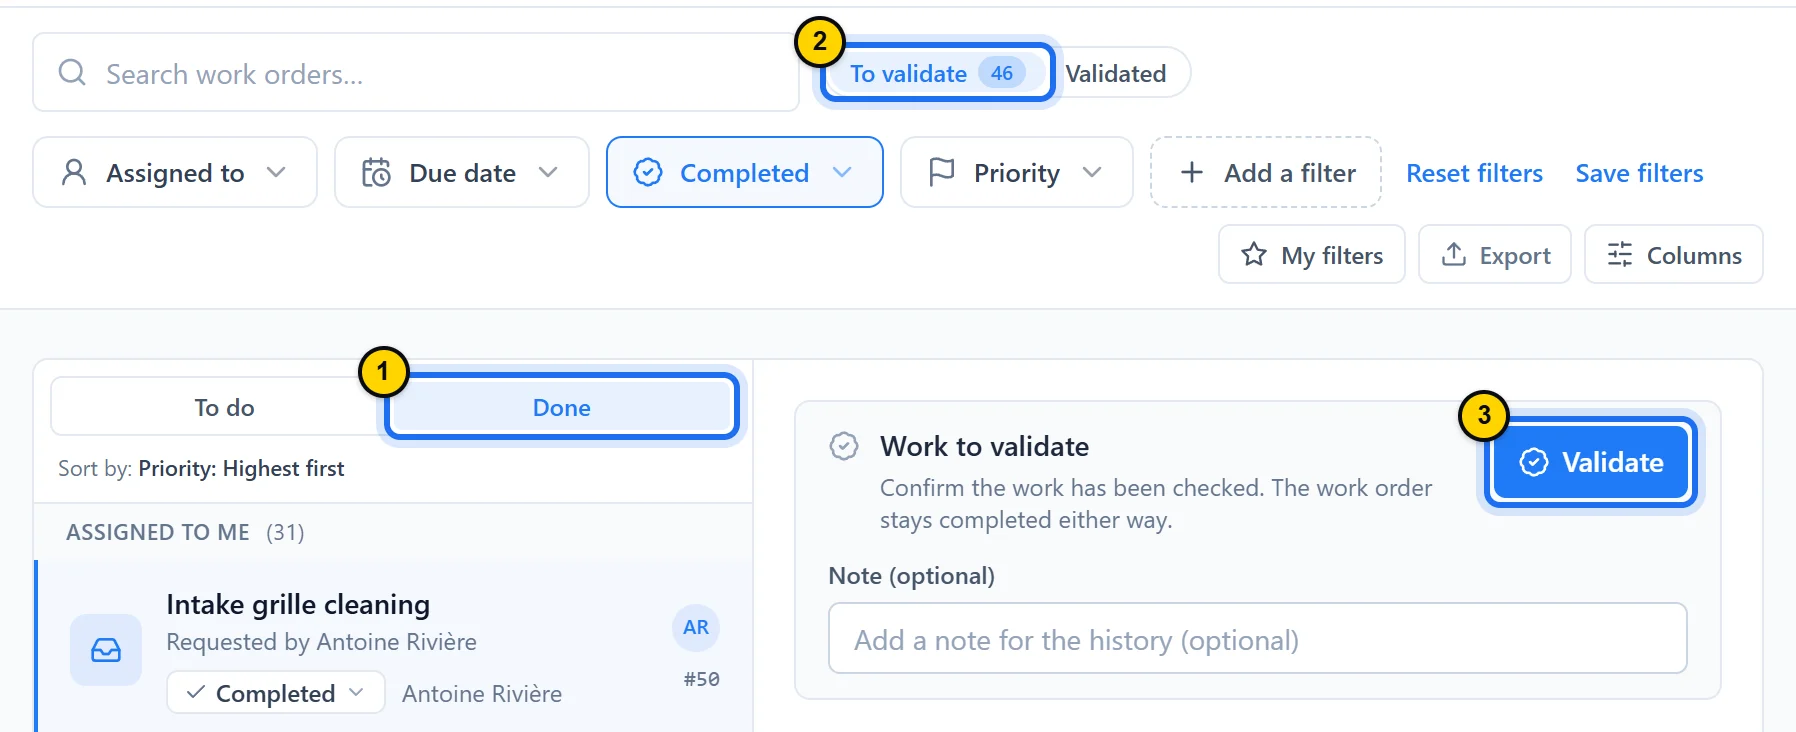
Fig. 2.7The queue of completed work orders to check, and the validation panel of the selected one.Tap the screenshot to enlarge it. - Marker 1: The Done tab of the To do view: work orders already completed.
- Marker 2: To validate: completed work orders nobody has validated yet.
- Marker 3: Validate: the manager confirms the work was checked; the people assigned are notified.
TipIf a procedure is attached to the work order, it must be completed before closing (procedures: Pro plan, lesson 5). If the asset is still down, Maint Vision offers Put back in service.
Good to know
- A Recurrence, offered with the Preventive and Regulatory types, turns the work order into a preventive maintenance plan on its asset: that is a Pro plan feature (lesson 6).
- Mention a colleague with @ in the work order’s Comments: they get a notification.
- The ⋯ menu on a work order offers Copy to new work order and Export to PDF; Save as template is part of the Pro plan.
- Only roles that hand out work (by default: owner, admins and managers) can move a due date, and the change does not notify the assignee: mention it in the comments.
- Offline, the mobile app shows the work orders you have already opened, for reading only. Nothing is queued for later: you change a status or add time and photos once you are back online.
Key takeaways
- A work order needs only a title; link it to its asset.
- The people assigned move it from “Open” to “Completed,” logging time, costs and parts.
- The manager validates the completed work, which joins the asset’s history.
Module overviewWork orders →